
![[Image description] A white woman with blue hair stands against a brick wall looking to her right, holding the purple Lucinda Bag.](https://d3gel9wqxksnxm.cloudfront.net/wp-content/uploads/2023/06/Lucinda-Bag-710x1000-1.jpg)
![[Image description] A white woman with blue hair stands against a brick wall looking to her right, holding the purple Lucinda Bag.](https://d3gel9wqxksnxm.cloudfront.net/wp-content/uploads/2023/06/Lucinda-Bag-710x1000-1.jpg.webp)
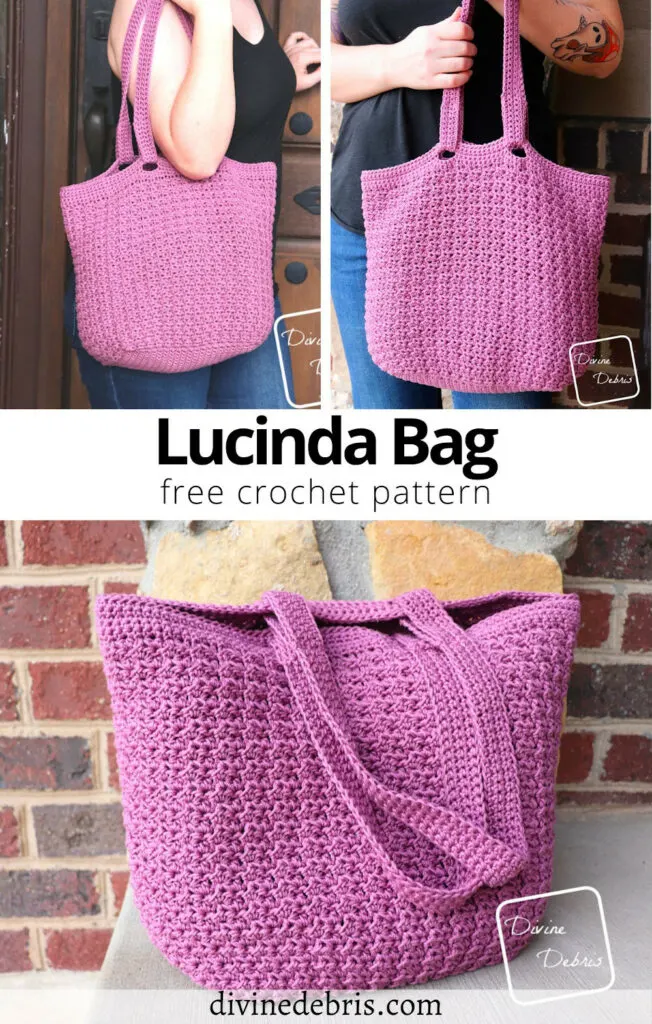
Hey I’m back! This is the first pattern release since my big move back to Utah last month. Actually, I released a pattern the day I moved and then it’s been nothing since. Honestly, I’m glad past-Amber was so on top of things because current-Amber is all scatter brained, can’t remember what day it is. Ha! But, like I said, past-Amber was looking out and planned this week’s release months ago – say hello to the Lucinda Bag crochet pattern.
For the eagle-eyed out there, you may notice something familiar about this new bag and that’s because it’s a variation on the January’s Lucinda Basket. I loved how that design worked up so much that I knew I needed to make another with that stitch. It’s a simple hdc/ slip st variation with turns (the turns are important) to give it some wonderful texture. I’m definitely going to find other things to use this texture for because I really love it.
Like the Lucinda Basket, this design is worked from the bottom up but for the Lucinda Bag, the base it worked as a rectangle instead of a circle. I love using rectangles for bag bases because they’re so sturdy and they give such a cool look to the bag. The rectangle makes the whole bag look more boxy but in a good way, ya know? And it makes it a nifty little book bag for library trips. That reminds me, I need to go to the library now that I’ve moved 😀
And after the base you work the Sides in the round and then fasten off, the Straps are worked separately. I wanted to make this bag a little more interesting so I made the straps separate, then you sew them to the bag. This gives you another avenue for customization because you can make these straps as long or as short as you’d like. Or! You could make them in a cool icord or something and really make them look neat… it’s up to you. I was going to make mine all cool and textured but I changed my mind, thinking simple was probably better.
Anyway, I hope you like this week’s new pattern. I love a good crochet bag, don’t you? I think it’s such a wonderful way to bring crochet with you during the warmer months. Thanks for checking out this pattern, I hope you make it and share some photos if you do.
Please note: I was provided the yarn for this pattern by Lion Brand Yarn for the purposes of designing the Lucinda Bag crochet pattern, with compensation. I wasn’t provided the yarn with the expectations of positive or negative reviews but I always enjoy using this yarn, I’ve used it many times, I really love making clothes and home items with the 24/7 Cotton yarn. If you purchase yarn through any of the links in this post, I will be compensated. You can purchase a kit for this pattern from Lion Brand Yarn as well
This post is linked to Loop Scoop 65 by Moogly
Copyright @ Divine Debris 2023. No part of this document may be reproduced or transmitted in any form by any means, electronic, mechanical, photocopying, or otherwise, without prior written permission from the author. Sales of finished products are permitted, but the designer requests that you link back to the pattern and credit Divine Debris with the original design under the Creative Commons Attribution-Share Alike license. If you have any questions, comments or concerns please contact info@divinedebris.com.
(this post contains affiliate links, if you make a purchase I may earn a commission)

If you appreciate my patterns I hope you’d consider purchasing an ad-free pdf of this pattern in my Ravelry shop and Lovecrafts shop!


Where to purchase the Lucinda Bag crochet pattern


![[Image description] A top down view of the Lucinda Bag laying on a cement background with a white woman's hand holding the left side and a cup of coffee on the right](https://d3gel9wqxksnxm.cloudfront.net/wp-content/uploads/2023/07/Lucinda-Bag-1000x975-1.jpg)
Level
Easy
Materials
- US H (5.00 mm) crochet hook
- Worsted/ medium/ size #4 weight yarn
- 10 oz/ 531 yds
- I use 24/7 Cotton by Lion Brand Yarn for this in the color Lilac
- Notions: scissors, measuring tape, yarn needle, stitch markers
Gauge
- 13 hdc x 10 rows = 4″
Terms/ Stitches used
- Sk: Skip
- St: Stitch
- Ch: Chain
- Rnd: Round
- Magic circle
- RS: Right side
- Slip St: Slip st
- Sc: Single crochet
- FLO: Front loop only
- Hdc: Half double crochet
- Join: Join rnds with a slip st
Notes
- In the bag’s texture the gauge is: 16 sts x 15 rows = 4”.
- Don’t make your slip sts (not the join, the ones within the rnds) too tight or it may make it difficult to work back into.
- This pattern is worked from the bottom up in 3 sections: the Base, the Sides, and the Straps. The Straps are worked separately and sewn to the Sides.
- The Base and Straps are worked in back and forth rows and the Sides are worked in the round with a slip st into the first st to join.
- There are turns each row/ round.
- The ch 1 at the beginning of the rows/ rnds does not count as a st.
- The sample in the photos was made using 3 skeins of 24/7 Cotton by Lion Brand Yarn in the color Lilac.
Approx Finished Product Details for the Lucinda Bag crochet pattern
| Height | Width | Base |
| 11.25” – 11.5” (Sides only, does not include the Straps) | 15.5” – 15.75” (laid flat) | approx 8”x 4.5” |
![[Image description] a white woman with blue hair stands against a brick wall holding the Lucinda Bag up toward the camera.](https://d3gel9wqxksnxm.cloudfront.net/wp-content/uploads/2023/06/Lucinda-Bag-748x1000-1.jpg)
Lucinda Bag Crochet Pattern Instructions
Base
Row 1: Ch 22, sc into the 2nd ch from the hook and across – 21 sc
Rows 2 – 42: Ch 1, turn, sc across – 21 sc
Do not fasten off, move onto the Sides.
Sides
Please note: the next rnd is worked all the way around the piece you just made.
(RS) Rnd 43: Ch 1, turn, sc into the next 21 sts, ch 1 at the corner and rotate your piece 90 degrees to the right, sc into the next 42 row ends, ch 1 at the corner and rotate your piece 90 degrees to the right, sc into the next 21 sts, ch 1 at the corner and rotate your piece 90 degrees to the right, sc into the next 42 row ends, ch 1 at the corner and rotate your piece 90 degrees to the right, slip st into the first st – 126 sc
Please note: The next rnd is worked FLO and you will skip the ch 1 sts at the corners.
Rnd 44: Ch 1, turn, hdc twice into the first st, sk the next st, slip st into the next st, *hdc twice into the next st, sk the next st, slip st into the next st, * repeat from * to * around, join – 84 hdc, 42 slip st
Rnds 45 – 81: Ch 1, turn, hdc twice into the first slip st, sk the next hdc, slip st into the next hdc, *hdc twice into the next slip st, sk the next hdc, slip st into the next hdc,* repeat from * to * around, join – 84 hdc, 42 slip st
Rnds 82 – 83: Ch 1, turn, sc into each st around, join – 126 sc
Rnd 84: Ch 1, turn, sc into the next 10 sts, ch 5, sk the next 5 sts, sc into the next 12 sts, ch 5, sk the next 5 sts, sc into the next 41 sts, ch 5, sk the next 5 sts, sc into the next 12 sts, ch 5, sk the next 5 sts, sc into the next 31 sts, join – 106 sc, 4 ch 5 spaces
Rnd 85: Ch 1, turn, sc into each st around (this includes the ch 5 spaces), join – 126 sc
Rnd 86: Ch 1, turn, sc into each st around, join – 126 sc
Rnd 87: Ch 1, turn, slip st into each st around, join – 126 slip st
Fasten off, weave in your ends.
![[Image description] The Lucinda Bag sits against a brick wall with the straps laid over the front of the bag.](https://d3gel9wqxksnxm.cloudfront.net/wp-content/uploads/2023/07/Lucinda-Bag-1000x806-1.jpg)
Straps
Row 1: Ch 101, sc into the 2nd ch from the hook and across – 100 sc
Rows 2 – 5: Ch 1, turn, sc across – 100 sc
Fasten off, block if necessary.
Assembly
Take one of your straps and mark 20 sts in on both ends with your stitch markers. Next, with the RS facing you, position your bag so that 2 of the ch 5 spaces from Rnd 84 are facing you. With the Strap you marked with your stitch markers, pull your strap through the right ch 5 space, so that the end of the strap is on the inside of the bag, and fold the 20 st section in half, lining the end sts of the strap with the stitch markers. Sew the end of the strap to the sts you marked with your stitch markers. Repeat this process with the left ch 5 space and the other side of the same strap. Flip your whole bag around and use your other strap and the other 2 ch 5 spaces to attach your second strap.
Below are a couple photos to help the assembly.
![[Image description] A white woman's hand pulls the right most strap in assembly photos of the Lucinda Bag](https://d3gel9wqxksnxm.cloudfront.net/wp-content/uploads/2023/07/Lucinda-Bag-1000x985-1.jpg)
![[Image description] A white woman's hand pulls the left most strap in assembly photos of the Lucinda Bag](https://d3gel9wqxksnxm.cloudfront.net/wp-content/uploads/2023/07/Lucinda-Bag-880x1000-1.jpg)
![[image description] Lucinda Bag strap fixed in place](https://d3gel9wqxksnxm.cloudfront.net/wp-content/uploads/2023/07/Lucinda-Bag-856x1000-1.jpg)
![[Image description] Back view of the secured strap on the Lucinda Bag](https://d3gel9wqxksnxm.cloudfront.net/wp-content/uploads/2023/07/Lucinda-Bag-912x1000-1.jpg)
You can pick up the Lucinda Bag Crochet Pattern in my Ravelry shop. Or buy the kit from Lion Brand Yarn.

Julie
Friday 16th of February 2024
I marked the beginning and ending stitches, but my chain spaces for the straps did not line up on the sides as they should. Will blocking help? Or do I need to redo the top of the bag?
Divine Debris
Friday 16th of February 2024
Oh no. Unfortunately blocking won't fix that, because I copied the pattern incorrectly and on Row 84 it should be flipped (sc into 10 sts at the beginning and 31 at the end). I am so sorry about that. I must have flipped the numbers and not noticed because the math still worked out.
Toni
Friday 1st of September 2023
I have tried this pattern several times and have had no luck I am searching for a video or some help
Divine Debris
Monday 4th of September 2023
Toni, as I've replied to multiple emails you've sent, I don't have any videos of this pattern. If you could reply to the emails and let me know what exactly you're struggling with I will try to help you the best I can.
Take care, Amber
Robyn Koralewski
Thursday 6th of July 2023
Is it the Lucinda bag or the Claire basket? Beginning of directions say Claire basket.