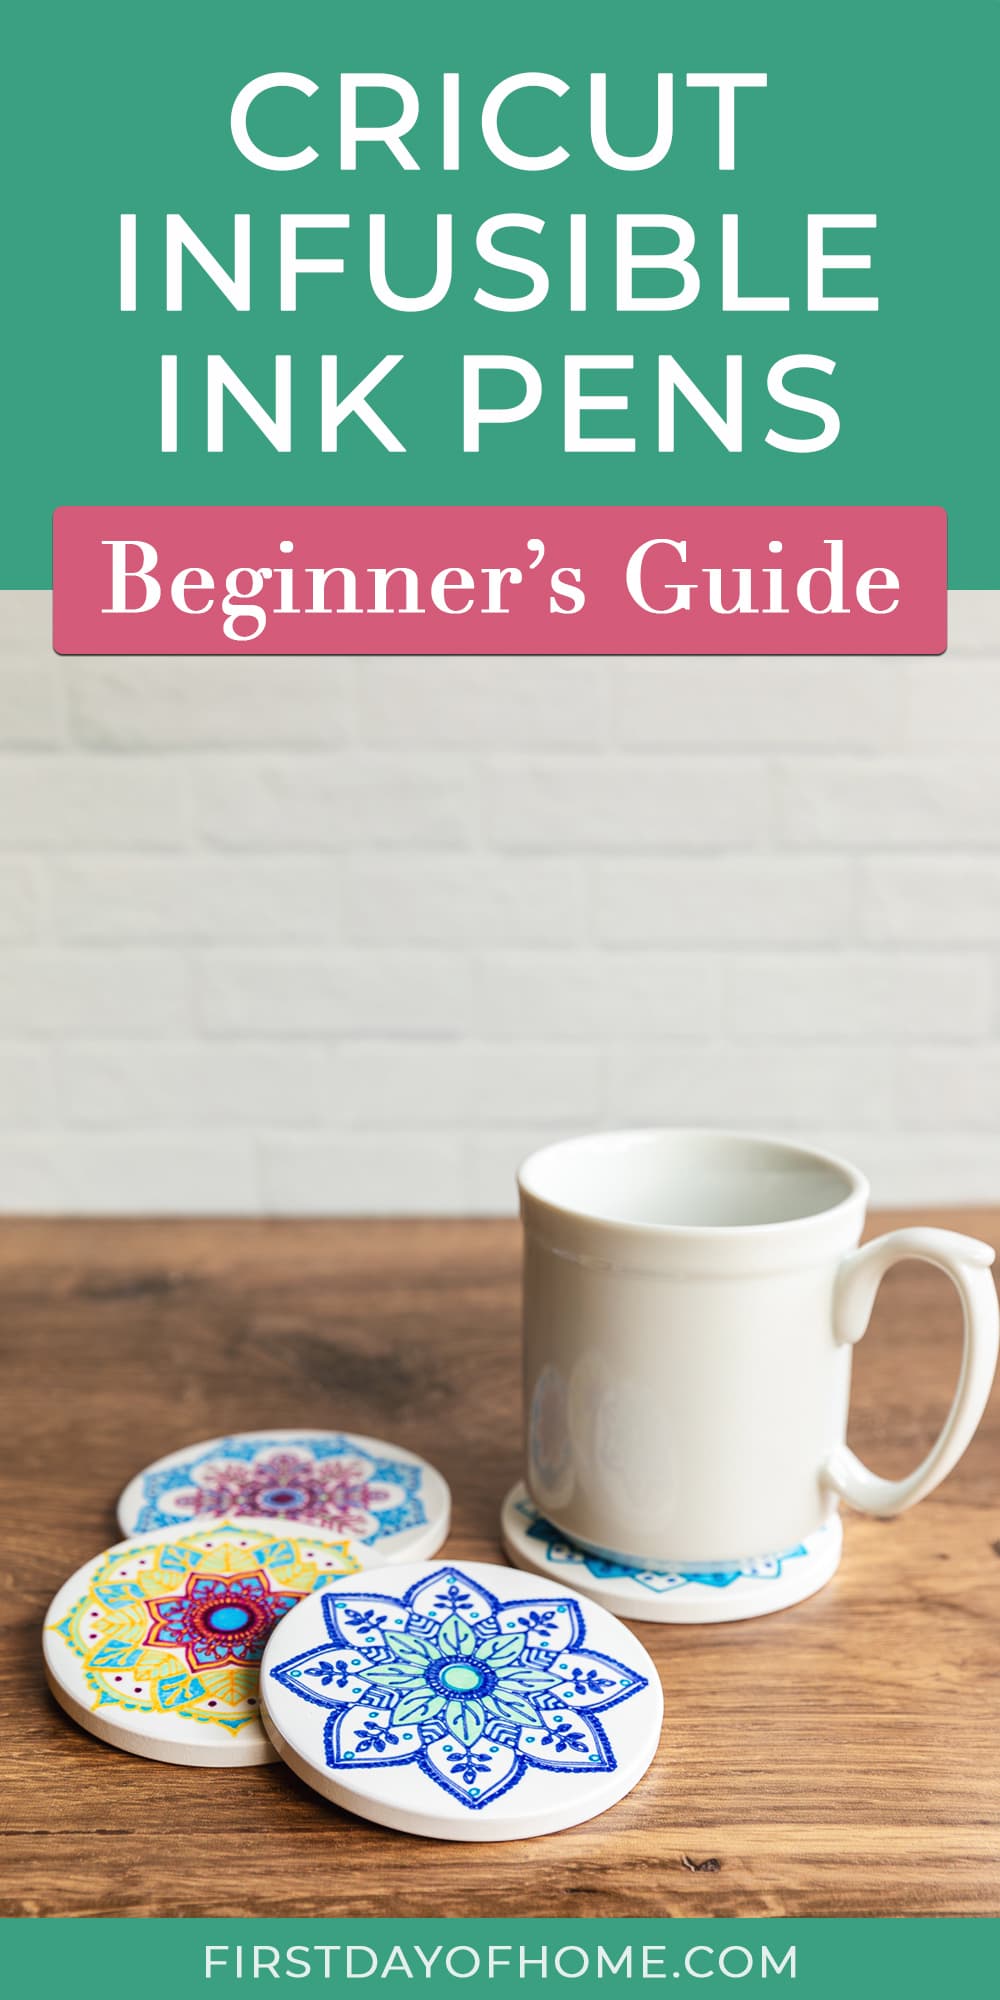
Quick Start Guide: Cricut Infusible Ink Pens
Once you learn how to use Cricut infusible ink pens, you’ll unleash so many creative possibilities. Grab a heat press, laser copy paper, and basic Cricut supplies to start experimenting with infusible ink pens. Think of all the personalized DIY gifts you can make this year!
This post contains affiliate links, and I will be compensated if you make a purchase after clicking on my links. For more information, please see my disclosures.
This post is sponsored by Creative Fabrica, my preferred source for design assets like fonts, SVG files, and other graphic art. All opinions expressed here are my own, and I only recommend products and services I personally enjoy. See the end of this post for a FREE trial offer to explore all the goodies that Creative Fabrica has to offer.
What are Cricut infusible ink pens?
Cricut infusible ink pens (0.4mm) can completely elevate your craft game! Like infusible ink transfer sheets, these pens offer a unique and vibrant way to infuse your designs permanently onto various surfaces (called “blanks”).
Cricut also sells a line of infusible ink markers (1.0mm), which have a thicker stroke to color in outlines made with the fine-point pens.
Unlike fabric pens, infusible ink pens are heat-activated, causing them to bind with the blank on which they are transferred. These pens won’t fade, crack, or peel after heat transfer, giving them a long-lasting result.
For all infusible ink projects, be sure to use a compatible infusible ink blank. According to Cricut’s help guide, you can only apply infusible ink on “specially engineered polymer or polyester-based” materials.
If your head is spinning a bit, start with my beginner’s guide to Cricut infusible ink. In that tutorial, you’ll learn exactly how to create your own custom t-shirt with infusible ink.
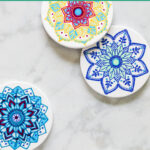
Tutorial: How to Make Cricut Infusible Ink Coasters
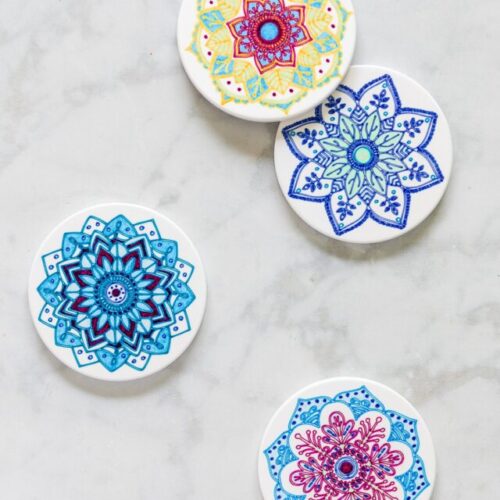
To illustrate the possibilities with infusible ink pens, we’ll create a beautiful set of coasters. These coasters would make great DIY gifts for Christmas, birthdays, or Mother’s Day. You’ll also have a chance to do some coloring along the way. My favorite part!

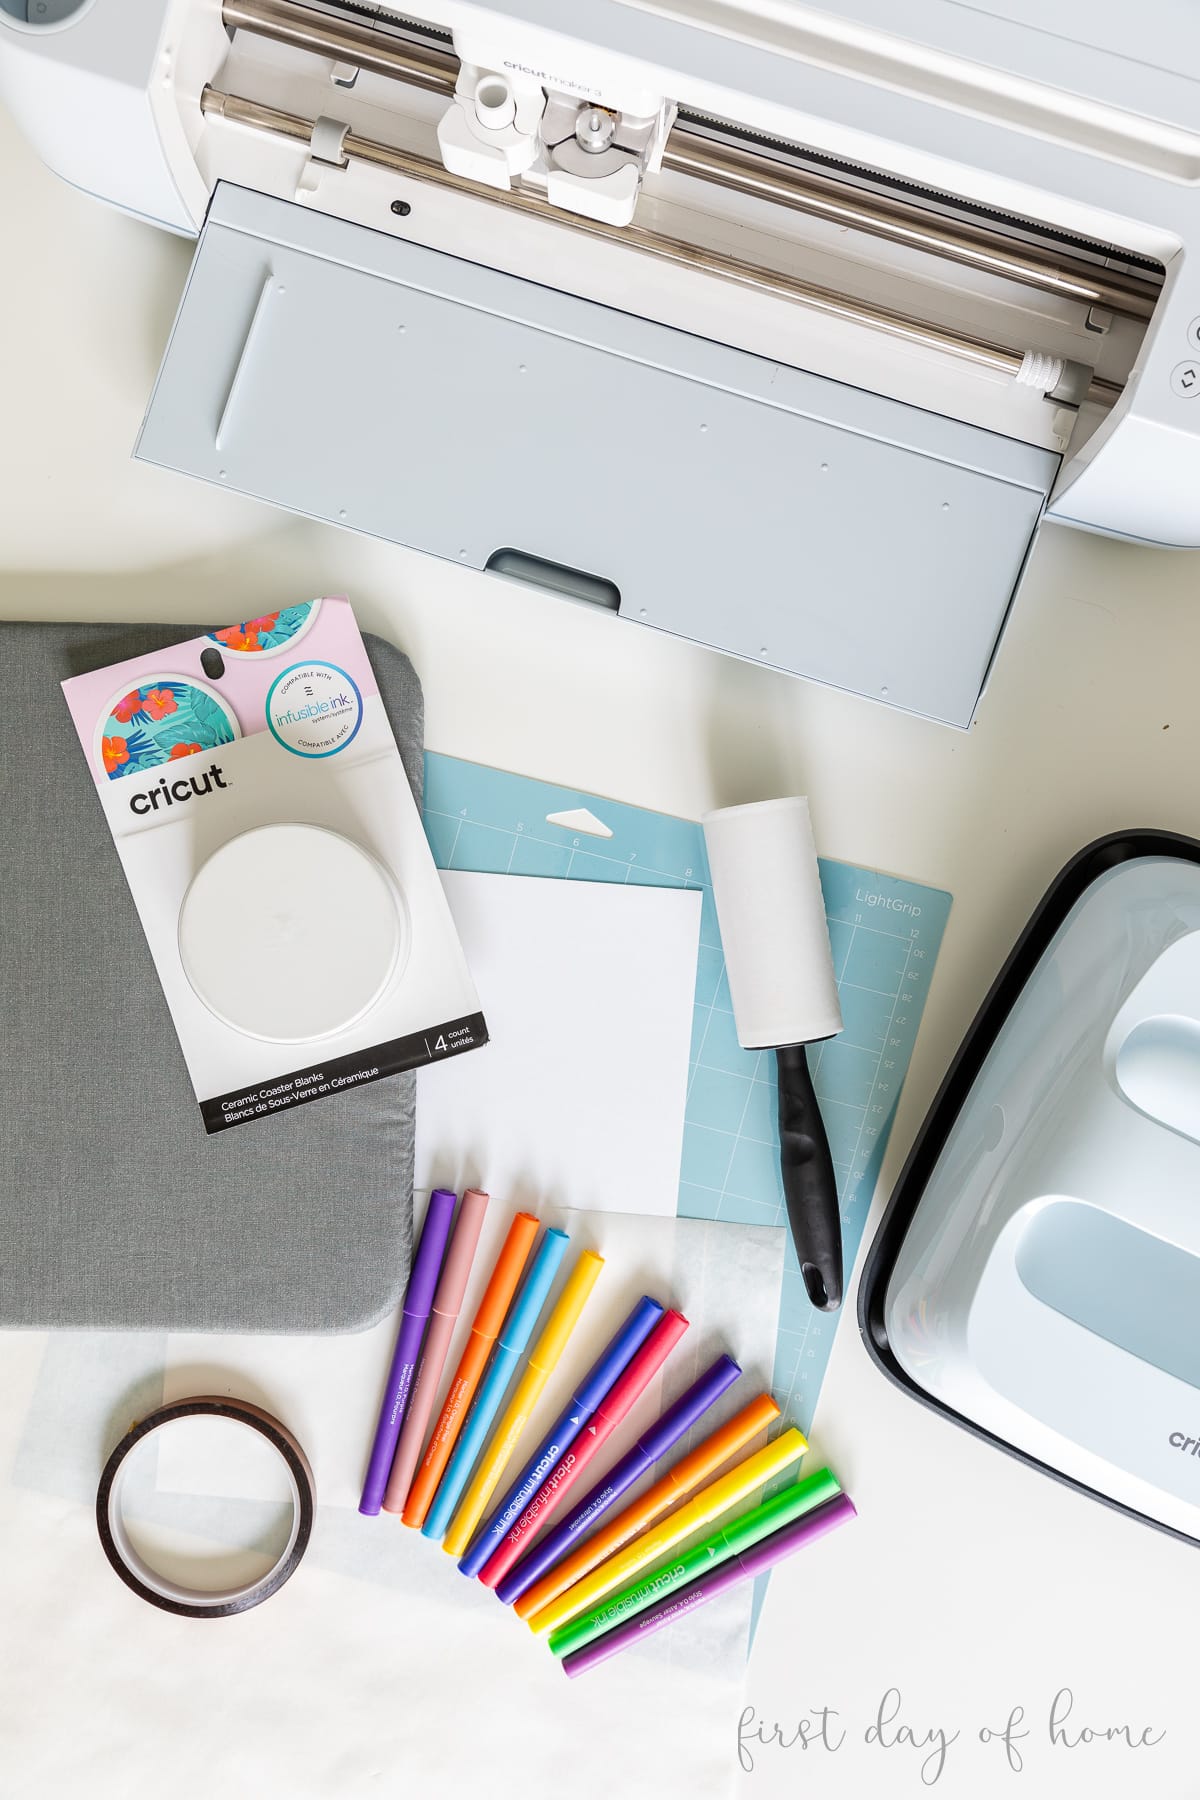
Supplies
- Cricut infusible ink pens and infusible ink markers
- Cutting machine (Cricut Explore, Cricut Maker or Cricut Joy with Joy-compatible pens)
- LightGrip machine mat
- Cricut EasyPress2, EasyPress3, EasyPress Mini, or AutoPress
- Cricut EasyPress Mat
- Cricut Ceramic Coaster Blanks
- Heat resistant tape
- Laser copy paper
- Butcher paper
- White cardstock
- Lint-free cloth or lint roller
If you don’t own an EasyPress, you can use another heat press machine if it heats to 400°F (205°C). Unfortunately, a household iron will not give the same results due to the inconsistency of the heat plate and size.
*The original Cricut EasyPress may give unpredictable results versus the newer models. Infusible ink pens can also be used with the Cricut Hat Press or Cricut Mug Press, so there are lots of creative possibilities beyond coasters.
Step 1: Upload and size your design in Cricut Design Space
When using external designs, start by uploading the SVG files in Cricut Design Space and add them to your canvas.
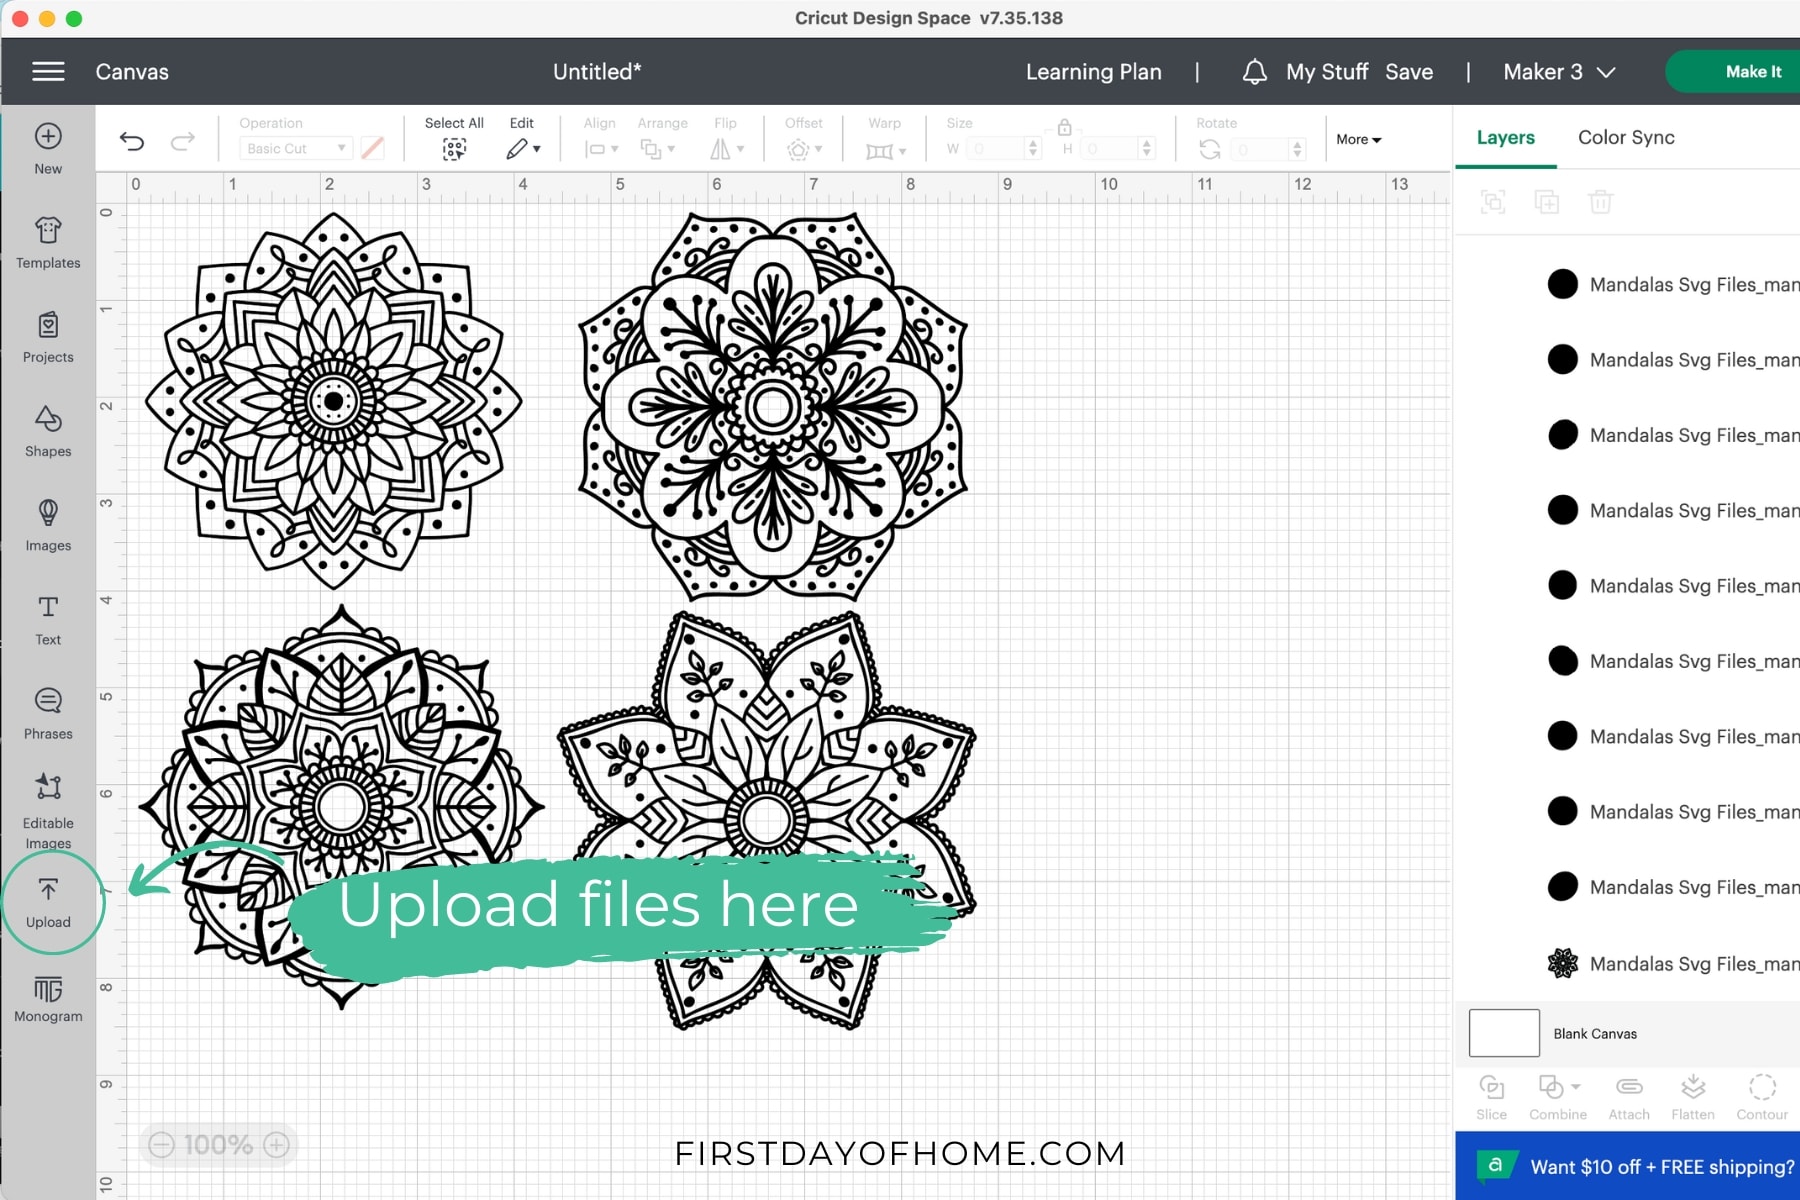
If you want to use the same mandala designs I’ve selected for this tutorial, you can find the SVG files here. With an all-access trial to Creative Fabrica, you can get these designs as one of 10 free downloads.
Get 10 Free Designs!
To download 10 free designs, including fonts and SVG files, sign up below for Creative Fabrica’s All Access Free Trial. Upon the 10th download or after 1 month, the free trial converts into an All Access subscription of $9 per month. You can cancel at any time, no questions asked. I’m doing it myself!
The best part is that these designs include a personal, commercial, and print-on-demand license. That’s almost unheard of for digital download sites.
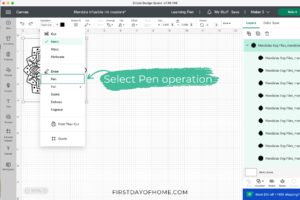
Step 2: Prepare design for drawing
Once you upload your SVG file into Cricut Design Space, it will look something like the image below. You’ll need to first change the Operation to Pen.

Then select the appropriate pen or marker color for infusible ink.
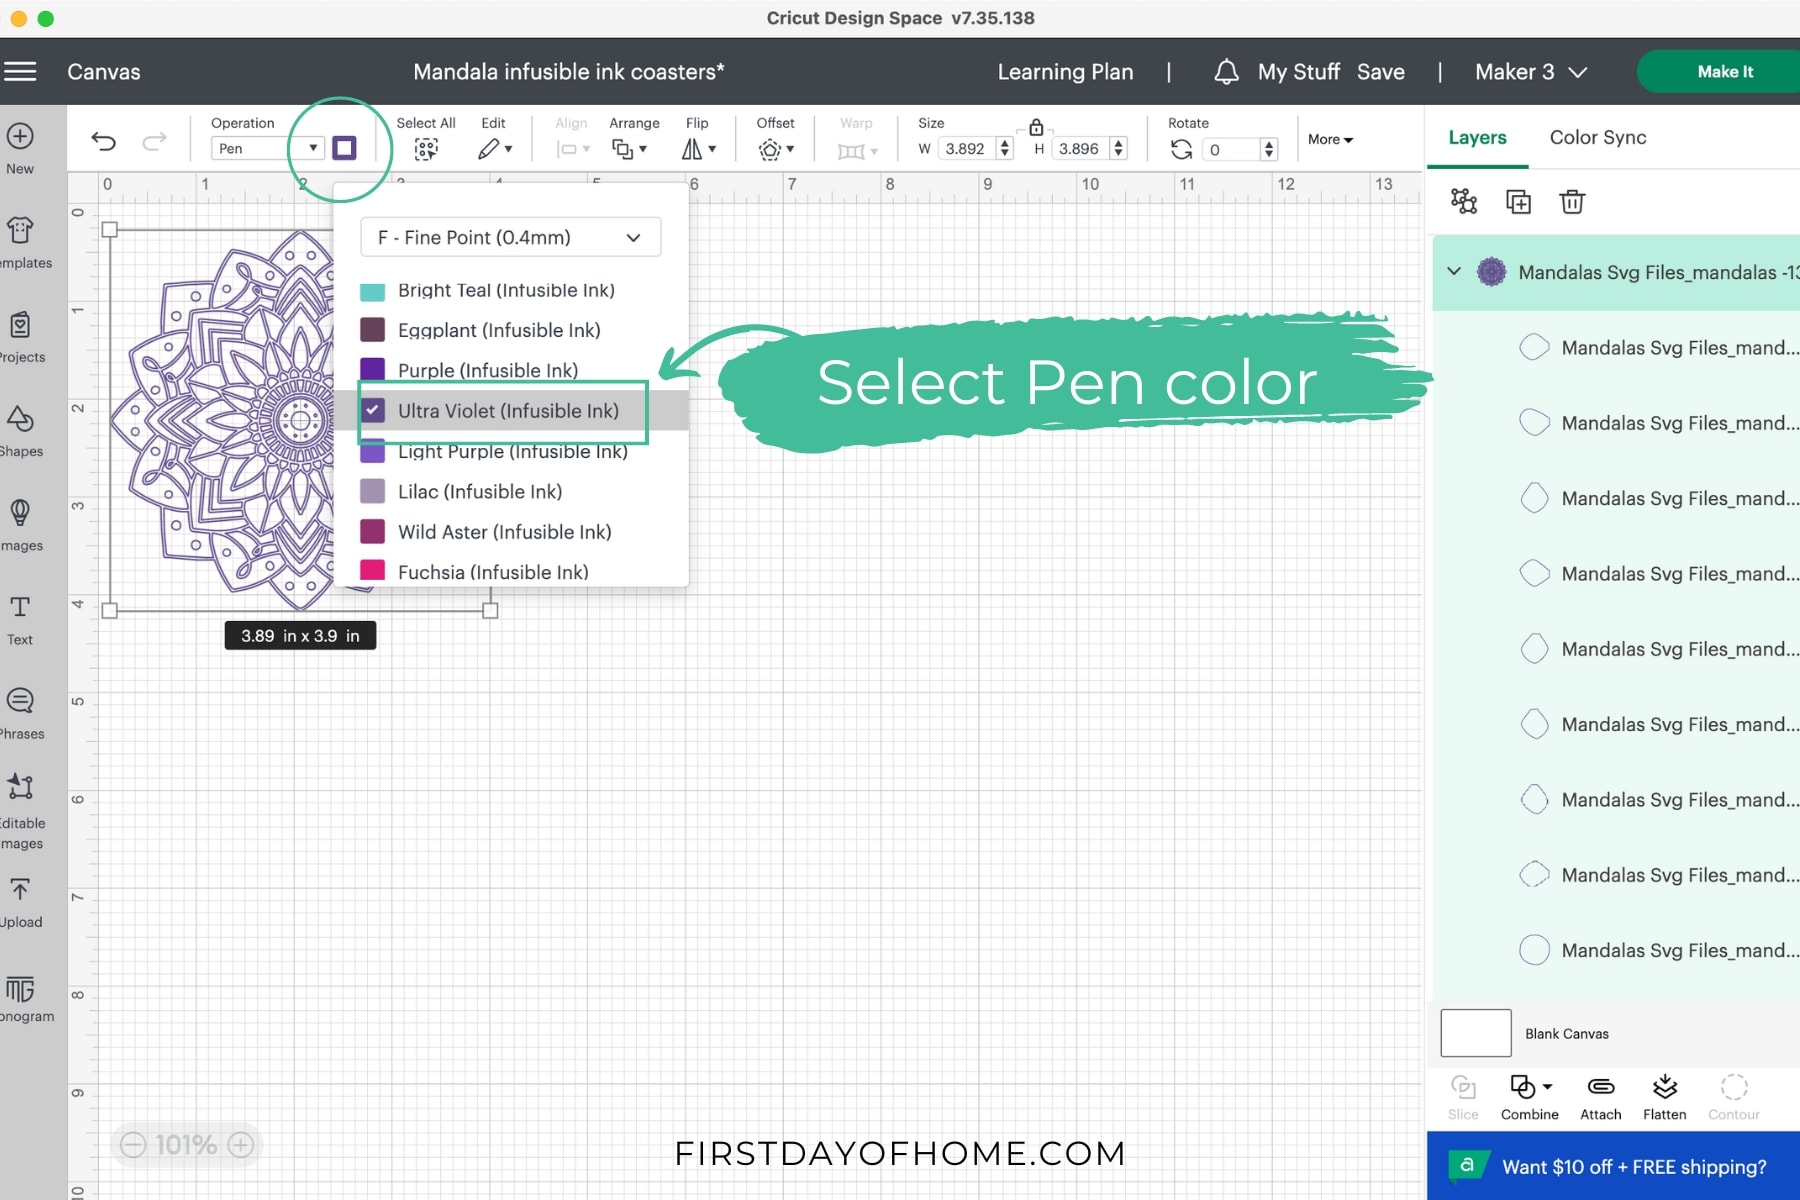
If you want your designs to have multiple colors, you can select parts of the shape to designate other colors. The software will prompt you to switch the pens or markers in the machine when the time comes. The other option is to color in your mandalas by hand after sending them to your machine.
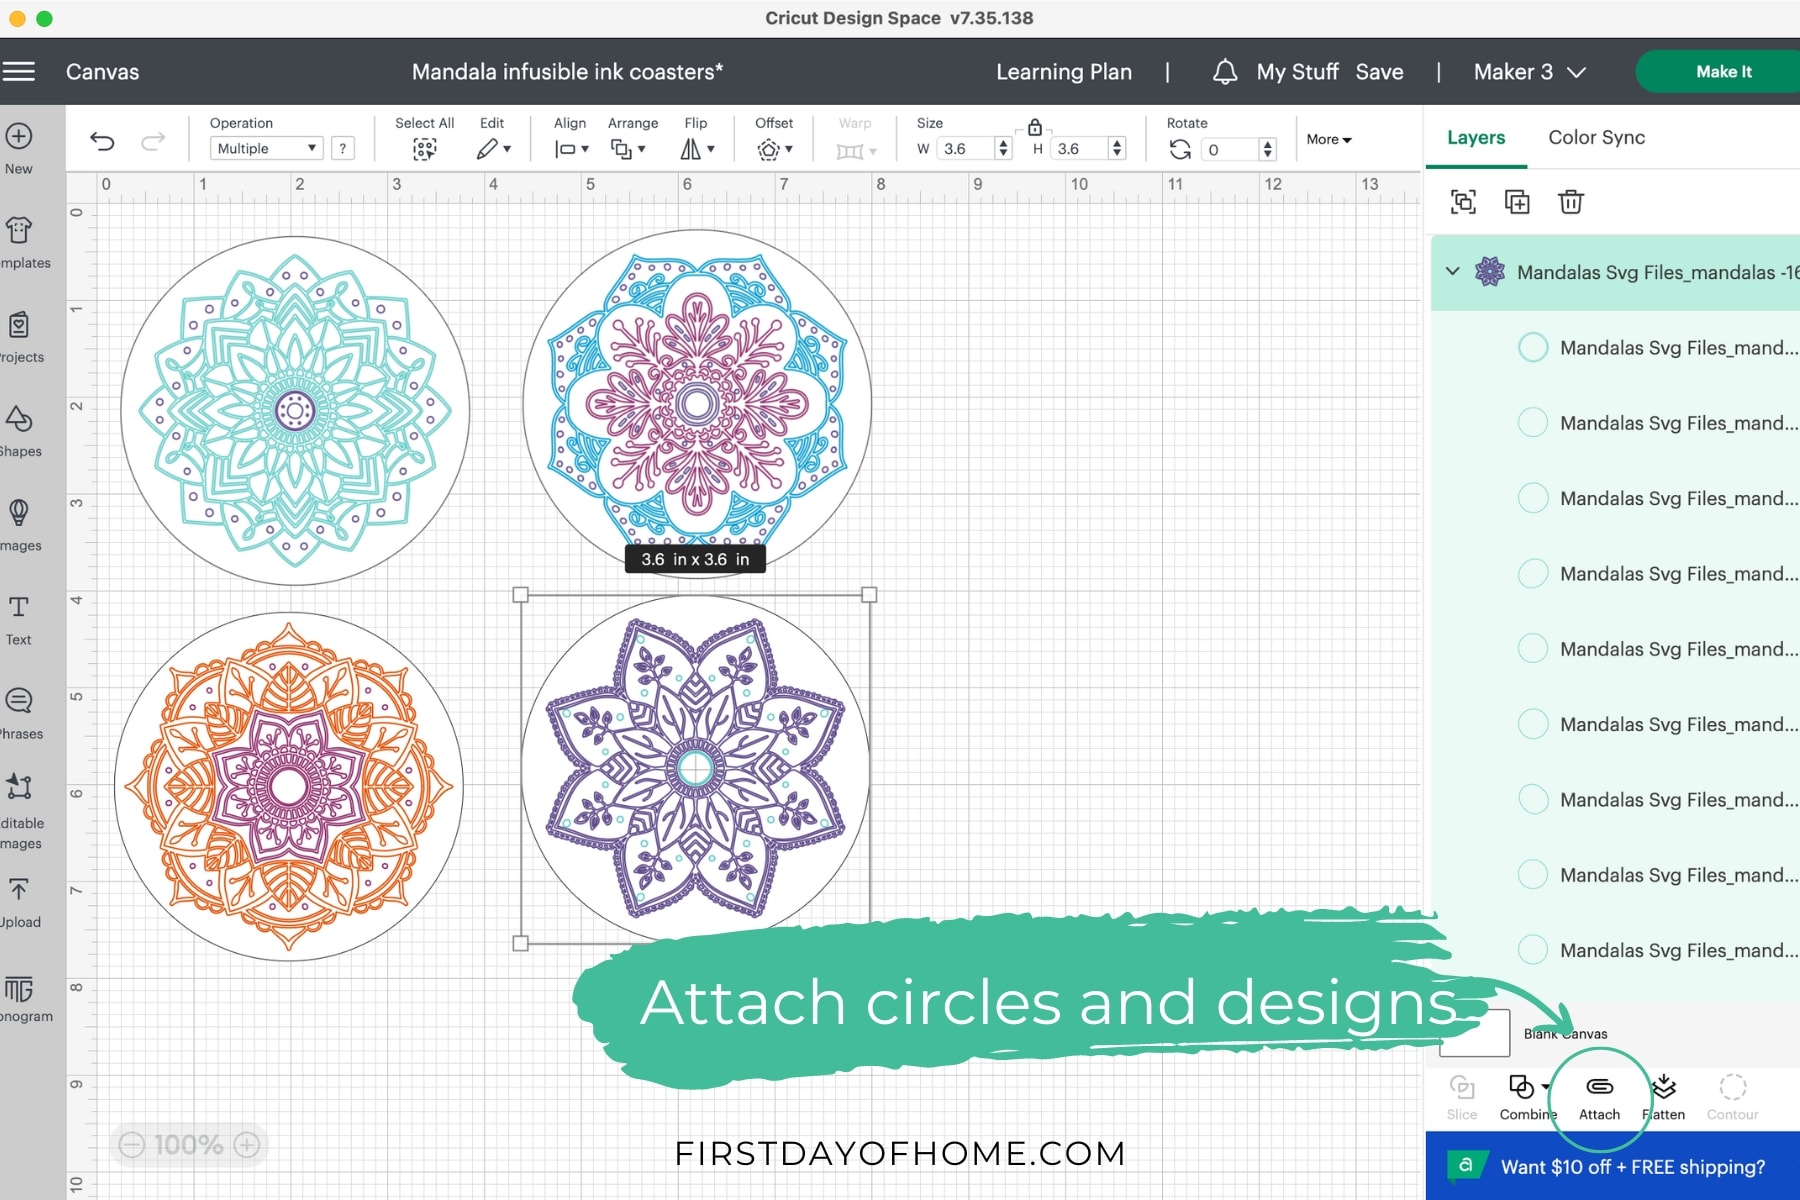
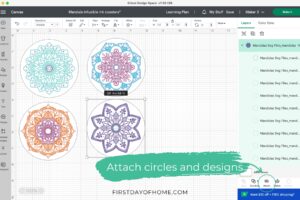
Step 3: Create coaster shapes in Cricut Design Space
For round coasters, create a circle that measures 3.5 inches to place behind the designs. Right-click on a circle and select “send to back” to place it behind each mandala. (You may also want to color the circle white to visualize it better.)
Next, select each mandala-circle pair, center them with the Align menu, and then click Attach. The attach function ensures they stay together during the drawing and cutting process.
Note: Cricut also sells square-shaped coasters, so you can create a square shape with the appropriate dimensions if you go that route instead. Then follow the specific heating instructions for square coasters. It’s important to note that the square coasters come with a cork backing while the round coasters do not.
Step 4: Send the design to your Cricut machine
Click Make It to send your coaster designs to your Cricut machine. Choose “on mat” to load materials since we’ll be using a LightGrip mat (light blue mat).
Place a sheet of laser printer paper onto the cutting mat and load the cutting machine when prompted. Laser copy paper typically does not have a coating, which allows for exposure to high temperatures.

You’ll need to move your design in Cricut Design Space to reflect the size of the paper on your mat. As you can see, some of the mandalas would be off the 8.5 x 11-inch paper if I didn’t rearrange them on the preview screen.
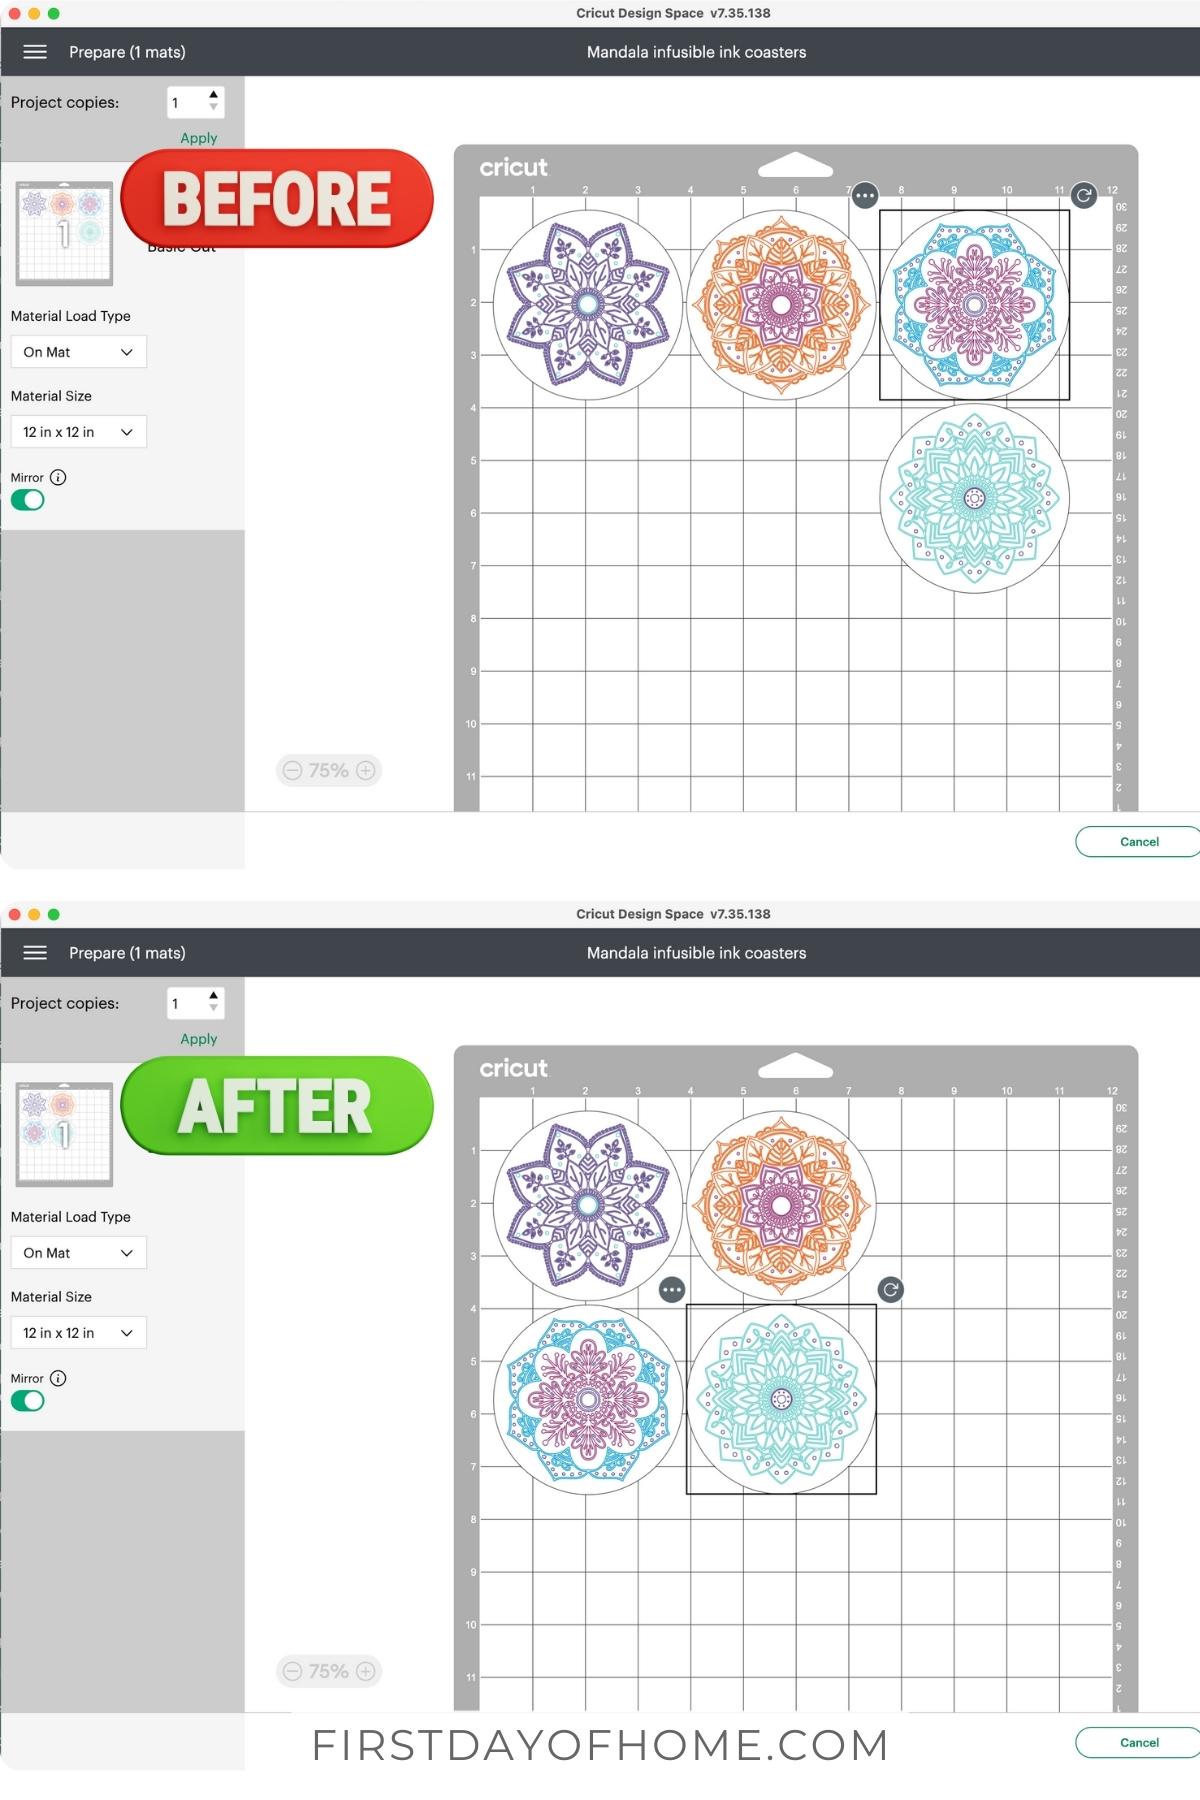
Note: Be sure to mirror the design in Design Space, especially if you have text or asymmetrical images.
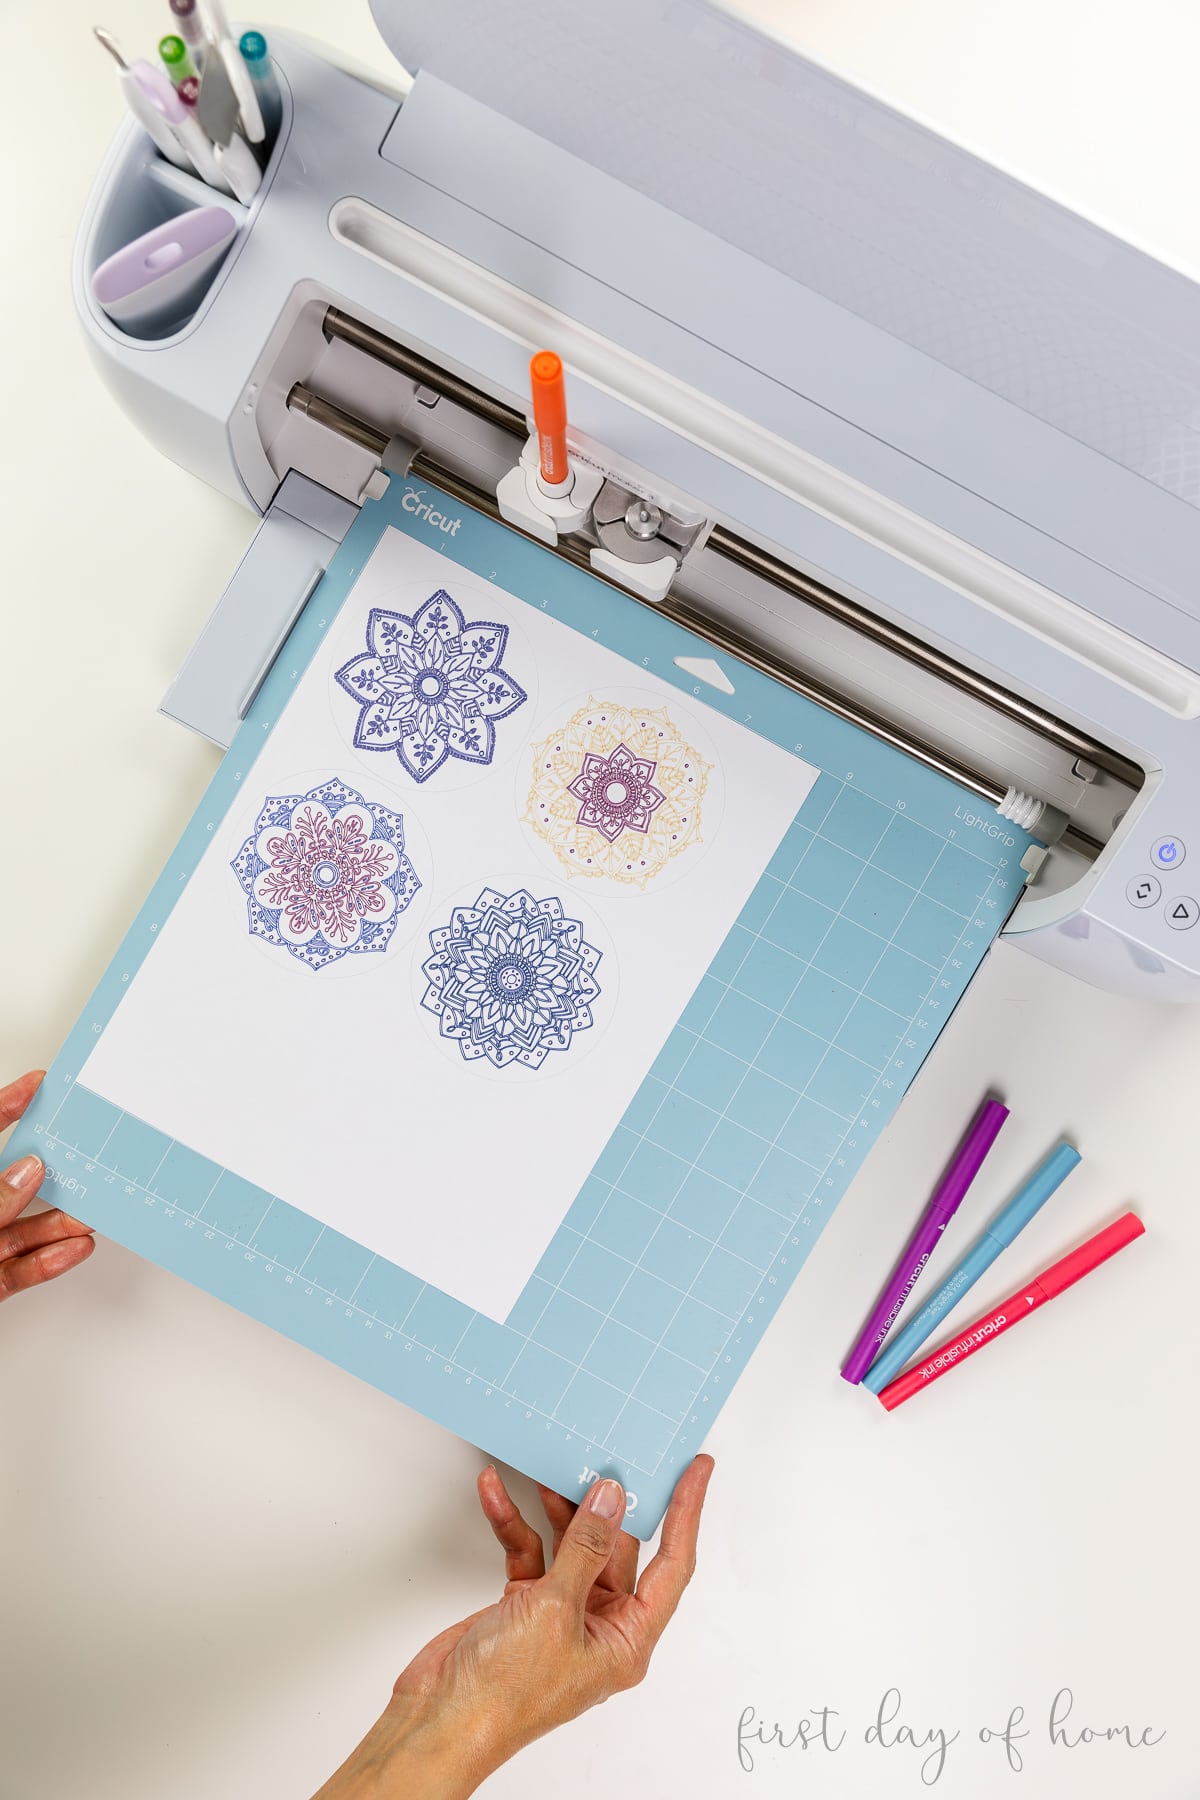
Select “laser paper” as the material, and load the appropriate infusible ink pen in Clamp A when prompted. After the machine has finished drawing with each unique color, the software will prompt you to swap out any additional colors before cutting the final designs.
Pro Tip
If you’re using Cricut infusible ink pens for the first time or after a long period, test the tip on a sheet of paper before sending your job to the machine. You may need to gently shake the pen to get the ink to flow.
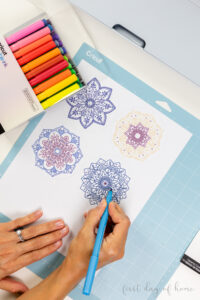
Step 5: Finish coloring designs, if desired
If you’d like to hand-draw additional colors on your coasters, you can do so with the paper on the mat, or you can remove the paper first (your choice).

To remove the paper, place the mat face-down and peel it away from the paper as shown below. This is always a good idea when releasing materials from a mat.

Step 6: Use a heat press to transfer designs to the coasters
With the EasyPress 3, you can send the heating instructions directly to your heat press using the Heat app (Apple or Android). Otherwise, refer to the Cricut Heat Guide for instructions on heating your coasters.
For round coasters and infusible ink pens, the heat press should be set at 400°F (205°C), and you will press the coasters for 240 seconds using an EasyPress (200 seconds for an Autopress).
Quick Guide to Pressing Infusible Ink Coasters
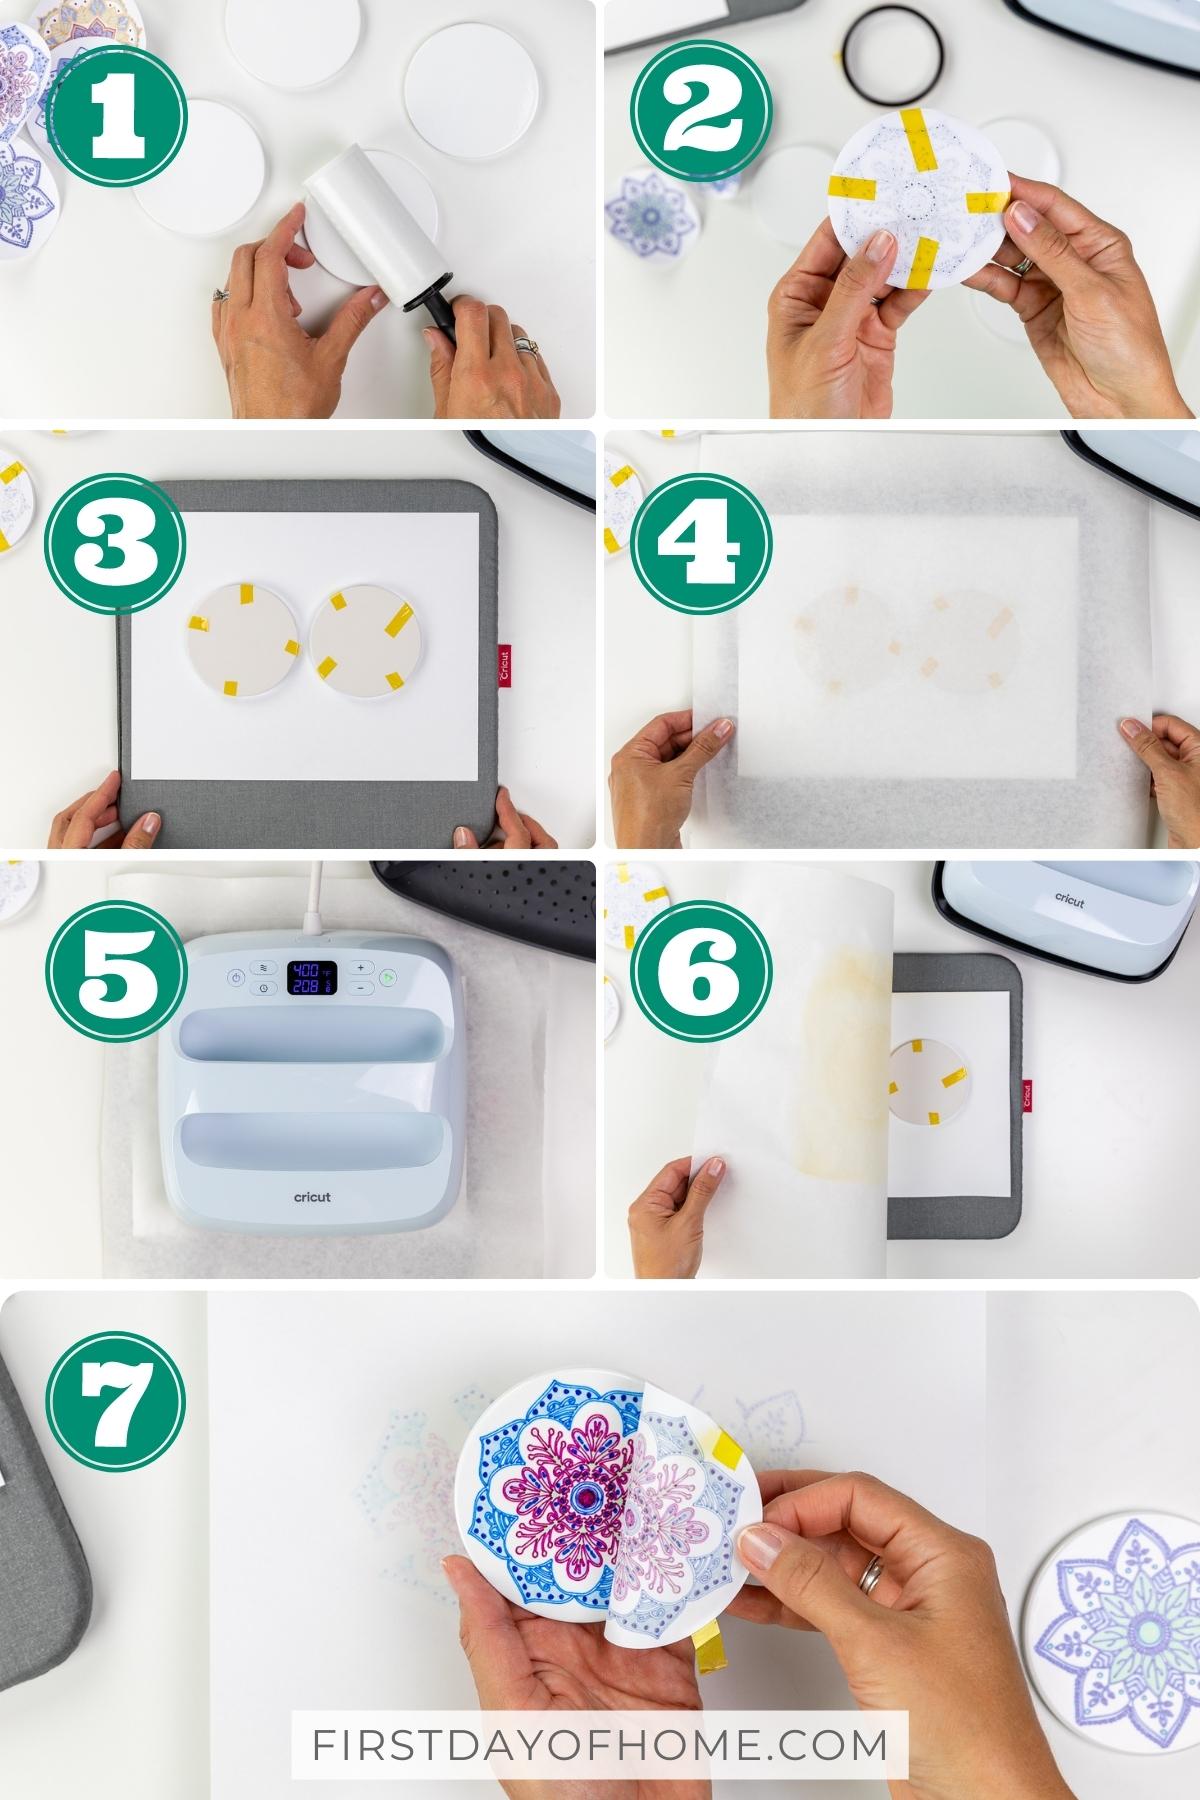
- As the press is heating, clean the coasters with a lint roller or lint-free cloth.
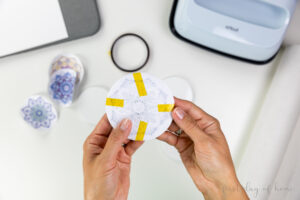
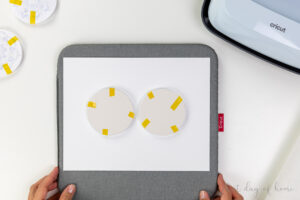
- Place the designs face down on each coaster, using heat-resistant tape to secure the designs in place.
- Cover the EasyPress mat with cardstock to protect the surface from unwanted ink transfer. Then place each coaster face down on the cardstock.
- Cover the coasters with a clean piece of butcher paper that is larger than the heat plate. (Cricut does not recommend reusing butcher paper after a heat transfer.)
- Once the heat press reaches the desired temperature, press the coasters for 240 seconds, applying no pressure.
- Remove the butcher paper and let the coasters cool completely. It may take up to 20-25 minutes for the coasters to cool.
- Once the coasters are cool to the touch, remove the heat-resistant tape to reveal the design. Coasters may be used immediately.
Caution: Hot Surface
Be sure to wait for the coasters to cool before handling them, or use heat-resistant gloves. The ceramic coasters will be quite hot immediately after applying infusible ink.
Creating your own designs with infusible ink pens
These mandala designs are just the tip of the iceberg. With the assortment of pen colors available, you could make any tote bag, cosmetic bag, t-shirt, or wine bag your heart desires!

I encourage you to sign up for Creative Fabrica’s All Access Free Trial to start experimenting with your 10 free designs. I’ve been a customer for several years now, and I’ve even taught several Cricut courses on their platform. You won’t regret it!

I hope you enjoy creating some infusible ink projects of your own! Be sure to tag me on Instagram when you share your projects.
Pin it for later!

FAQs
Can you blend infusible ink pens and markers?
Cricut infusible ink pens and markers don’t blend well, but you can easily add depth and dimension to your designs by incorporating different shades of colors.
Can you use regular copy paper with infusible ink pens?
No. Cricut recommends using laser copy paper because it does not have a coating like some inkjet papers, which helps it withstand the higher temperatures required for infusible ink sublimation.
Can I layer designs with infusible ink pens and heat-transfer vinyl (iron-on vinyl)?
Yes! First, apply your infusible ink layer, then adjust your heat setting to apply iron-on vinyl to your design.
Can you wash Cricut infusible ink coasters?
You can hand wash your infusible ink coasters with warm water and glass cleaner. Do not use harsh abrasives like steel wool or scrubbing pads.
Why did my infusible ink design get smudged or blurry?
Ghosting or blurriness may occur if the laser copy paper is not secured well with heat-resistant tape. Additionally, you should not move the heat press or apply additional pressure during the heating process.
How to Use Infusible Ink Pens: Coaster Tutorial
Equipment
-
Cricut Maker Cricut Explore or Cricut Joy will also work
-
EasyPress 3 or heat press that reaches 400°F (205°C), including EasyPress 2, EasyPress Mini, or Autopress
Supplies
- Infusible ink pens
- Infusible ink markers (optional)
- Laser copy paper
- Cricut ceramic coaster blanks
- Lint roller or lint-free cloth
- Heat resistant tape
- White cardstock
- Butcher paper
Instructions
Customize the design in Cricut Design Space
-
If desired, download the featured mandala designs, and save the SVG files on your computer. (See notes below to get the files for free.) Alternatively, you can choose a design from Cricut Design Space.
-
If you are using an external file, start by uploading the SVG into Cricut Design space. Then resize your design to fit the Cricut coaster blank (about 3.6 inches).

-
In the Operation menu, select Pen under the Drawing section.
-
Then choose a color for each part of the design under the color drop-down menu. Scroll until you see the "infusible ink" color options. You can select multiple colors for each shape, and the software will prompt you to load each color into the cutting machine at the appropriate time.
-
Add circles to create coaster shapes behind each design. You may need to right-click the circle and select "Send to Back" to see your design on top. Align a circle to each coaster design, and click Attach to ensure they are drawn and cut together.


Draw and Cut the design
-
Send the designs to your cutting machine by clicking Make It. When prompted, load a sheet of plain laser copy paper onto a LightGrip (light blue) cutting mat.

-
Mirror the design. Then adjust the designs in the Preview screen to ensure they are drawn and cut within the dimensions of the laser copy paper.
-
Select Laser paper as the base material, and load the appropriate pen in Clamp A of your Cricut machine.
-
Fill in with any additional colors desired using Cricut pens and markers. Once finished, remove the paper circles from the mat.


Heat the designs with a heat press
-
Use the Cricut Heat app (for EasyPress 3) or the Cricut Heat Guide online to determine the heating temperature and time to press the coasters. For the EasyPress 3 and Cricut coaster blanks, the heat press should be at 400°F (205°C).
-
Clean the coasters with a lint-free cloth.
-
Place the designs face down on each coaster, using heat-resistant tape to secure the designs in place.
-
Cover the EasyPress mat with cardstock to protect the surface from unwanted ink transfer. Then place each coaster face down on the cardstock.
-
Cover the coasters with a clean piece of butcher paper that is larger than the heat plate. (Cricut does not recommend reusing butcher paper after a heat transfer.)
-
Once the heat press reaches the desired temperature, press the coasters for 240 seconds, applying no pressure.
-
Remove the butcher paper and let the coasters cool completely. It may take up to 20-25 minutes for the coasters to cool.
-
Once the coasters are cool to the touch, remove the heat-resistant tape to reveal the design. Coasters may be used immediately.
-
Use your infusible ink coasters immediately, or attach a thin cork sheet on the back of the coasters for extra durability.


Notes
You Might Also Like