
![[image description] Front on view of a white woman with blue hair wearing the Alix Cardigan, looking at the camera standing on a road with lots of green landscaping](https://d3gel9wqxksnxm.cloudfront.net/wp-content/uploads/2022/03/Alix-Cardigan-728x1000-1.jpg)
![[image description] Front on view of a white woman with blue hair wearing the Alix Cardigan, looking at the camera standing on a road with lots of green landscaping](https://d3gel9wqxksnxm.cloudfront.net/wp-content/uploads/2022/03/Alix-Cardigan-728x1000-1.jpg.webp)
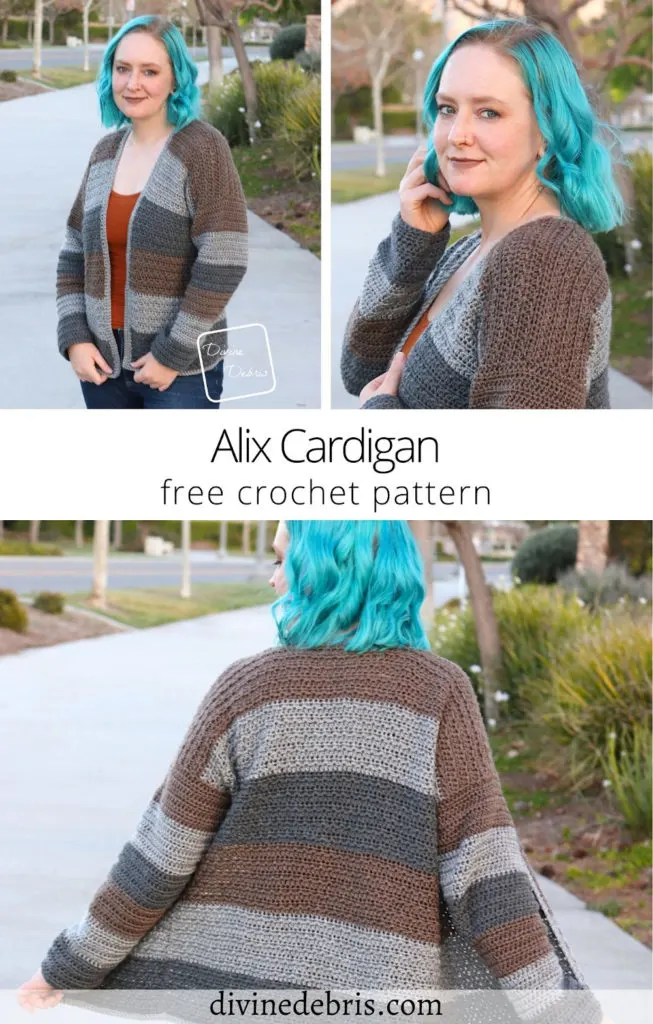
Hi everyone! How’s your Spring starting? Are you ready for fun and light makes like me? Well, despite how excited I am, the weather is still not warm enough here so I still need a cardigan or two. Luckily, the week I’m bringing you the Alix Cardigan crochet pattern, which is a fun and easy cardi if you still need something to snuggle up in.
This month’s new premium pattern is the Heather Cardigan and in a weird way in my head it made sense to do a “cardigan theme” which really just means I wanted to make one for my blog too. It’s not much of a theme but let’s not analyze that, ya know? 😉 Let just have fun making squishy cardigans. And this week’s new one is an addition to the Alix Line, which I love because it’s got lots of squishy texture. I love to find ways of expanding the line… I wonder what I’ll come up with next time.
Anyway, as I was saying. The Alix Cardigan is an easy one. The front and back panels are all worked in rows from the bottom up, then you seam them together to create the body, then the sleeves, waistband, and lapel are worked onto the body. I like to make cardigans like that because I love the structure of seams, they keep the dreaded sag away, and it just makes sleeves easier. I’ve designed only 1 sweater with sleeves worked flat and seamed to the body and I didn’t hate it but I don’t want it again, ya know what I mean?
And I hope people find this an easy cardigan to stash bust with. Make it in all the colors you have laying around! Go for a rainbow or stripes. I love stripes. And with texture like this you can’t lose. All the colors will look fab. Just try it out. 😀
Anyway, happy Spring. Keep cozy wherever you are & as always to be kind to each other, wash your masks, and stay safe friends <3 <3
This post is linked to Loop Scoop 35.
Please note: I was provided Basic Stitch for this pattern by Lion Brand Yarn for the purposes of designing the Alix Cardigan crochet pattern, with compensation. I wasn’t provided the yarn with the expectations of positive or negative reviews but I honestly can say I do enjoy this yarn, I used it on my so many times, including on my C2C Coffee Blanket, and it is a fantastic worsted. If you purchase yarn through any of the links in this post, I will be compensated.
Copyright @ Divine Debris 2022. No part of this document may be reproduced or transmitted in any form by any means, electronic, mechanical, photocopying, or otherwise, without prior written permission from the author. Sales of finished products are permitted, but the designer requests that you link back to the pattern and credit Divine Debris with the original design under the Creative Commons Attribution-Share Alike license. If you have any questions, comments or concerns please contact info@divinedebris.com.
(this post contains affiliate links)

If you appreciate my weekly patterns I hope you’d consider purchasing an ad-free pdf of this pattern in my Ravelry shop and Lovecrafts shop!
Thank you all my patrons on Patreon!
Where to purchase the Alix Cardigan crochet pattern


![[Image description] The Alix Cardigan laid flat on a white textured background, a white woman's hand holds the bottom of the right sleeve.](https://d3gel9wqxksnxm.cloudfront.net/wp-content/uploads/2022/03/Alix-Cardigan-1000x999-1.jpg)
Level
Advanced Easy
Materials
- US H (5.00 mm) crochet hook
- I used this set from We Crochet
- Size #4/ worsted weight yarn
- I used Basic Stitch by Lion Brand Yarn
- 1 – 3 colors
- Specifics listed in Finished Product Dimensions (below)
- Notions: scissors, measuring tape, yarn needle
Gauge
- 14 hdc x 10 rows = 4” (blocked)
Terms/ Stitches used
- RS/WS: Right side/ Wrong side
- Rnd: Round
- St: Stitch
- Ch: Chain
- Sc: Single crochet
- Sc2tog: Single crochet 2 sts together
- BTLO: Back third loop only (explained below)
- Hdc: Half double crochet
- Hdc2tog: Hdc 2 sts together
Notes
- BTLO: (back third loop only): when looking at the stitch you will have the 2 loops on top of the hdc (the V on top), lean the stitch towards you and will see the third loop that runs along the back of the stitch. This is the loop you will work into. This stitch is also known as the Camel Stitch. Please note that when you work this stitch you will be looking at the back of the previous row’s hdc, so the third loop will be facing you.
- This pattern is worked in 5 sections: the Back Panel, the Front Panels (2), the Sleeves (2), the Lapel, and the Waistband. The Back and Front Panels are worked from the bottom up in rows, the Sleeves are worked in the round with a join at the end of the rnd, and the Lapel/Waistband are worked in rows.
- The ch 1 at the beginning of the rows/rnds does not count as a st.
- Blocking is recommended for this pattern.
- The size in the photos is medium, made in Basic Stitch Anti-Pilling by Lion Brand Yarn. Color A: dark gray (BS in Charcoal Heather), color B: light gray (BS in Silver), and color C: brown (BS in Taupe Heather).
Approx Finished Product Details for the Alix Cardigan crochet pattern (blocked)
| XSmall Height: 24.5” Width: 18” Fits Chest: 28″ – 30″ Yarn A: 6.5 oz/ 344 yds B: 7.6 oz/ 402 yds C: 6.3 oz/ 333 yds | Small Height: 24.5” Width: 20” Fits Chest: 32″ – 34″ Yarn A: 7.2 oz/ 381 yds B: 8.3 oz/ 439 yds C: 6.9 oz/ 365 yds | Medium Height: 24.5” Width: 22” Fits Chest: 36″ – 38″ Yarn A: 7.4 oz/ 412 yds B: 9 oz/ 476 yd C: 7.6 oz/ 402 yds |
| Large Height: 24.5” Width: 24” Fits Chest: 40”- 42” Yarn A: 8.3 oz/ 439 yds B: 9.6 oz/ 507 yds C: 8.1 oz/ 428 yds | 1X Height: 24.5” Width: 26” Fits Chest: 44″ – 46″ Yarn A: 9.1 oz/ 481 yds B: 10.4 oz/ 550 yds C: 8.9 oz/ 470 yds | 2X Height: 29” Width: 28” Fits Chest: 48″ – 50″ Yarn A: 11.2 oz/ 592 yds B: 12.7 oz/ 671 yds C: 10.9 oz/ 576 yds |
| 3X Height: 29” Width: 30” Fits Chest: 52″ – 54″ Yarn A: 12 oz/ 634 yds B: 13.5 oz/ 714 yds C: 11.7 oz/ 618 yds | 4X Height: 29” Width: 32” Fits Chest: 56″ – 58″ Yarn A: 12.5 oz/ 661 yds B: 14.1 oz/ 745 yds C: 12.2 oz/ 645 yds | 5X Height: 29” Width: 33” Fits Chest: 60″ – 62″ Yarn A: 12.9 oz/ 682 yds B: 14.9 oz/ 789 yds C: 12.6 oz/ 699 yds |
![[image description] Side view of a white woman with blue hair wearing the Alix Cardigan, looking at the camera standing on a road with lots of green landscaping](https://d3gel9wqxksnxm.cloudfront.net/wp-content/uploads/2022/03/Alix-Cardigan-685x1000-1.jpg)
Alix Cardigan Crochet Pattern Instructions
Back
Sizing as follows: XS (SM, MD, LG, 1X)(2X, 3X, 4X, 5X)
(RS) Row 1: A: Ch 64 (72, 78, 86, 92)(100, 106, 112, 116), hdc into the 3rd ch from the hook (the skipped sts count as a hdc), hdc across – 63 (71, 77, 85, 91)(99, 105, 111, 115) hdc
Row 2: Ch 1, turn, hdc into the first st, *hdc BTLO into the next st, hdc into the next st,* repeat from * to * across – 63 (71, 77, 85, 91)(99, 105, 111, 115) hdc
Row 3: Ch 1, turn, hdc across – 63 (71, 77, 85, 91)(99, 105, 111, 115) hdc
Row 4: Ch 1, turn, hdc into the first st, *hdc BTLO into the next st, hdc into the next st,* repeat from * to * across – 63 (71, 77, 85, 91)(99, 105, 111, 115) hdc
Rows 5 – 60 (60, 60, 60, 60)(72, 72, 72, 72): repeat rows 3 – 4, a total of 28 (34) more times.
For stripes
Sizes XS – 1X: color A rows 1 – 10, color B rows 11 – 20, color C rows 21 – 30, color A rows 31 – 40, color B rows 41 – 50, and color C rows 51 – 60.
Sizes 2X – 5X: color A rows 1 – 12, color B rows 13 – 24, color C rows 25 – 36, color A rows 37 – 48, color B rows 49 – 60, and color C rows 61 – 72.
Fasten off, weave in your ends. Block your piece so it measures 18” x 24” (20” x 24”, 22” x 24”, 24” x 24”, 26” x 24”)(28” x 28.5”, 30” x 28.5”, 32” x 28.5”, 33” x 28.5”.
Front Panels (make 2)
(RS) Row 1: A: Ch 26 (30, 32, 36, 40)(44, 46, 50, 52), hdc into the 3rd ch from the hook (the skipped sts count as a hdc), hdc across – 25 (29, 31, 35, 39)(43, 45, 49, 51) hdc
Row 2: Ch 1, turn, hdc into the first st, *hdc BTLO into the next st, hdc into the next st,* repeat from * to * across – 25 (29, 31, 35, 39)(43, 45, 49, 51) hdc
Row 3: Ch 1, turn, hdc across – 25 (29, 31, 35, 39)(43, 45, 49, 51) hdc
Row 4: Ch 1, turn, hdc into the first st, *hdc BTLO into the next st, hdc into the next st,* repeat from * to * across – 25 (29, 31, 35, 39)(43, 45, 49, 51) hdc
Rows 5 – 60 (60, 60, 60, 60)(72, 72, 72, 72): repeat rows 3 – 4, a total of 28 (34) more times.
For stripes:
Sizes XS – 1X: color A rows 1 – 10, color B rows 11 – 20, color C rows 21 – 30, color A rows 31 – 40, color B rows 41 – 50, and color C rows 51 – 60.
Sizes 2X – 5X: color A rows 1 – 12, color B rows 13 – 24, color C rows 25 – 36, color A rows 37 – 48, color B rows 49 – 60, and color C rows 61 – 72.
Fasten off, weave in your ends. Block your piece so it measures 7” x 24” (8” x 24”, 8.8” x 24”, 10” x 24”, 11” x 24”)(12” x 28.5”, 13” x 28.5”, 14” x 28.5”, 14.5” x 28.5”.
Seaming
Shoulders
Line up the Front Panels with the Back Panel, with the RS touching each other (this is a great time to use stitch markers if you have them to line up the stitches). Using your preferred method of seaming, seam together the 25 (29, 31, 35, 39)(43, 45, 49, 51) sts of one of the Front Panels to the last 25 (29, 31, 35, 39)(43, 45, 49, 51) sts of the Back Panel. Repeat this seaming with the first 25 (29, 31, 35, 39)(43, 45, 49, 51) sts of the Back Panel and your other Front Panel.
Sides
With the wrong side facing you, line up the Rows 1 of a Front Panel and the Back Panel and, in your preferred method of seaming, seam together the Rows 1 – 42 (42, 40, 40, 37)(49, 47, 47, 47) of both Body sections. Repeat seaming with the other side of the Back Panel and the other Front Panel. The unseamed 18 (18, 20, 20, 23)(23, 25, 25, 25) rows (both panels) are your arm holes.
Sleeves
Sizing as follows: XS (SM, MD, LG, 1X)(2X, 3X, 4X, 5X)
Note: for stripes change colors every 7 rows working C, B, A, C, B, and A.
Rnd 1: C: With the RS facing you, create a slipknot on your hook with color C (this will make your first st a standing hdc) start in the first row end to the left of the seam you made on the Body (this is the underarm area), hdc into the first 2 (2, 1, 1, 3)(3, 2, 2, 2) row ends, hdc twice into the next row end, *hdc into the next 2 row ends, hdc twice into the next row end,* repeat from * to * until 3 (3, 2, 2, 3)(3, 2, 2, 2) row ends remain, hdc until the end , join – 47 (47, 53, 53, 60)(60, 66, 66, 66) hdc
Rnds 2 – 6: Ch 1, turn, hdc around, join – 47 (47, 53, 53, 60)(60, 66, 66, 66) hdc
Rnd 7: Ch 1, turn, hdc around until 2 sts remain, hdc2tog the last 2 sts – 46 (46, 52, 52, 59)(59, 65, 65, 65) hdc
Rnds 8: Ch 1, turn, hdc around, join – 46 (46, 52, 52, 59)(59, 65, 65, 65) hdc
Rnds 9 – 42: repeat ends 7 – 8 until you get a stitch count of 36 (36, 42, 42, 42)(52, 52, 52, 52) hdc around, then continue rnds until you reach rnd 42. Feel free to adjust your decreases as needed for your preferred fit.
After rnd 42, fasten off the active color and switch to color A.
Rnds 43 – 44: Ch 1, turn, sc around, join – 36 (36, 42, 42, 42)(52, 52, 52, 52) sc
Fasten off, weave in your ends. Block your sleeve so it’s 18” in length. Repeat Sleeve instructions on the other arm hole.
Feel free to add or subtract rows to adjust the length.
Waistband
With color B and the RS facing you, flip your whole piece around so you’re working along the other side of Row 1 of one of the Front Panels.
(RS) Row 1: B: Create a slipknot on your hook (this will make your first st a standing sc), sc into the 25 (29, 31, 35, 39)(43, 45, 49, 51) sts of the Front Panel, sc into the 63 (71, 77, 85, 91)(99, 105, 111, 115) sts of the Back Panel, sc into the 25 (29, 31, 35, 39)(43, 45, 49, 51) sts of the other Front Panel – 113 (129, 139, 155, 169)(185, 195, 209, 217) sc
Row 2: Ch 1, turn, sc across – 113 (129, 139, 155, 169)(185, 195, 209, 217) sc
Do not fasten off (unless you’d like to) move onto the Lapel. Block this section if it’s stiff.
Lapel
Row 1: B: Ch 1 from where you stopped on the Waistband, sc into the 2 rows of the Band, move onto the Front Panel, *sc once into the next 2 rows ends, sc twice into the next row end,* repeat from * to * all the way up the row ends, sc across the unworked sts of the Back Panel, move onto the other Front Panel, *sc once into the next 2 rows ends, sc twice into the next row end,* repeat from * to * all the down up the row ends, sc into the 2 rows of the Waistband – 177 (177, 179, 179, 177)(209, 211, 209, 209) sc
Rows 2 – 3: Ch 1, turn, sc across – 177 (177, 179, 179, 177)(209, 211, 209, 209) sc
Fasten off, weave in your ends. Block this section if it’s stiff.
And don’t forget you can buy the Alix Cardigan crochet pattern on Ravelry.
![[Image description] A back view of the Alix Cardigan being worn by a white woman with blue hair on a street with a lots of greenery.](https://d3gel9wqxksnxm.cloudfront.net/wp-content/uploads/2022/03/Alix-Cardigan-850x1000-1.jpg)

Beth
Wednesday 18th of October 2023
Can't wait to make this! It's perfect