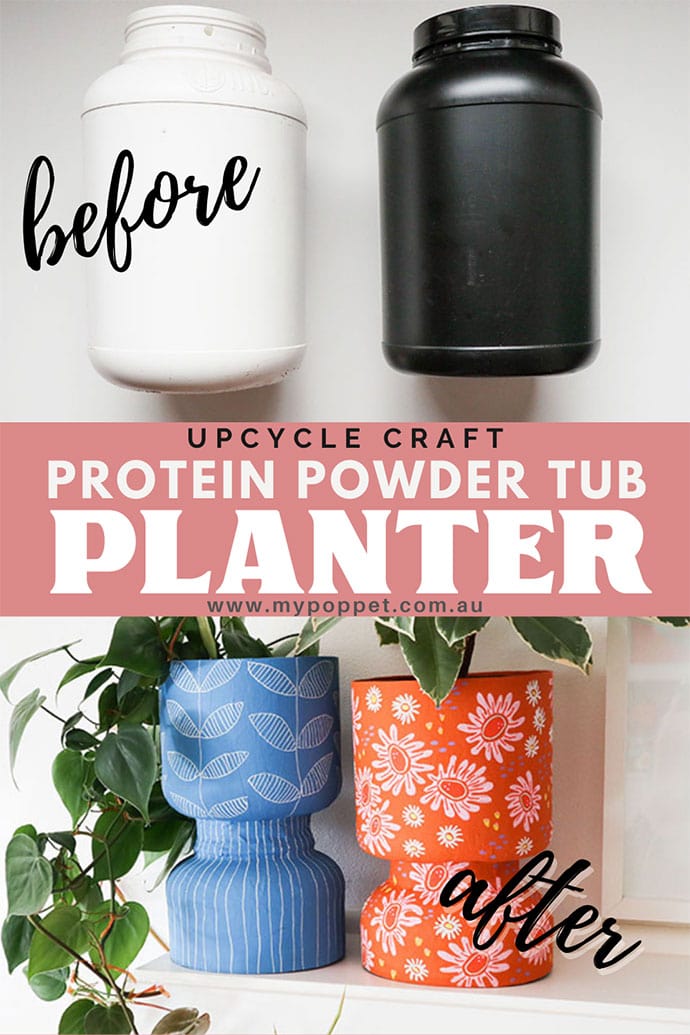
If you are looking for ways to reuse and repurpose those large empty protein power containers, I have a great idea – Turn them into decorative planters for your house plants!

This post contains affiliate links.
I have a friend who gets through quite a lot of protein supplements. Because she knows that I’m quite crafty, she asked me for ideas to repurpose protein powder containers.
Well I do love a bit of upcycling, so I set myself a challenge to find a novel way to use and recycle her empty protein tubs.
Because I have lots of house plants the most practical idea was to make decorative planters with them.
I’m always looking for pretty planters that I can sit my house plants in. I prefer to keep my plants in lightweight plastic pots with good drainage so they are easy to move and water.

Annoyingly the plastic pots look ugly, so it’s nice to be able to hide them in decorative planters that have the added bonus of catching any water leaks from drainage holes.
A Zero-Waste Recycling idea for empty protein containers
Originally I was just going to cut the tops off these protein powder containers and use the bottom as a pot holder, but then I had the fab idea to use the top and add it to the bottom like a pedestal.

It’s a modern take on a traditional urn shape, with the bonus of being zero-waste because I used the whole plastic protein powder container.
I love how these planters turned out.
You’d never guess that they were old empty protein tubs. The key is the textured surface finish I created using paper mache. It gives it the feel of handmade ceramic don’t you think?
These planters are my favourite upcycling projects I’ve made in quite a while. The idea is so simple, and I used only basic supplies that I had at home.

Not a quick project. From start to finish these upcycled planters probably took me around 2-3 days when you factor in the drying time of the paper mache and then painting. But a very striking finished result in my opinion.
You may also enjoy these upcycling craft projects:
Let’s Make a Paper Mache Planter from an Old Protein Powder Tub
This upcycling project can be made with just some basic craft supplies, and recycles not only a plastic container, but also scrap paper.
I’ve used paper mache as an effective way to add some extra strength and texture to the surface of these unwanted empty protein powder containers. Adding a paper mache layer also makes for a great surface to paint and decorate.

Paper mache is the technique of layering strips of paper with glue to create a hard form when the glue dries. Often it’s done over a balloon to create a round shell once the balloon is removed, but in this case we will use it as an outer layer.
I found the best paper to use was non-shiny newsprint style paper like you can find in IKEA instruction leaflets, phone books or recycled printer paper.

By keeping the paper mache on the outside only, it gives us a great surface for painting a decorative design onto the exterior of the planter. The inside of the planter remains waterproof and leak-proof, thanks to the robust plastic tub interior.
Decorate this planter anyway you wish to suit your decor. I’ve painted my planters with chalk paint to give a terracotta like matte finish and then added organic floral patterns and line designs with paint markers.
Other decorative suggestions include:
- Decoupage with patterned gift wrapping paper
- Colour block paint in solid colours
- Stencil on a geometric design
- Leave printed paper mache exposed
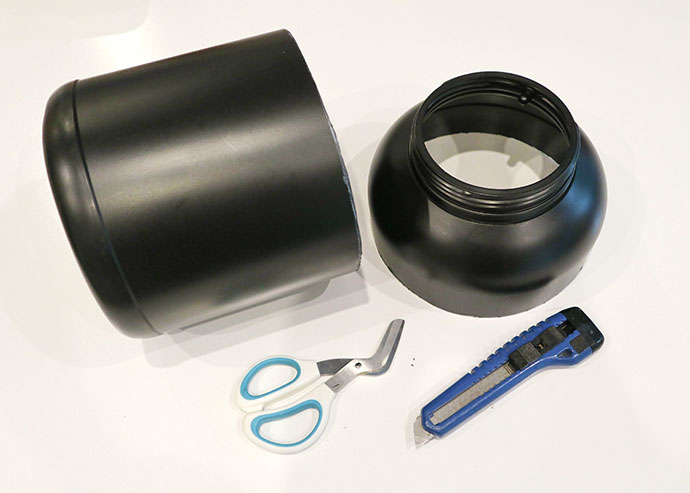
You will need:

- Empty protein powder tub (with or without lid)
- Torn strips of paper (newspaper or IKEA instructions leaflets work well)
- PVA glue (white glue) and/or Mod Podge
- Ruler
- Marker or wax pencil
- Cutting tool – Utility knife and Heavy duty scissors
- Duct tape
- Sponge Brush
- Paint of choice – Acrylic, Chalk paint and/or paint pens
- Paint brushes
Mod Podge or PVA – Which glue shall I use?

Both PVA (also known as white glue or Elmer’s glue) and Mod Podge decoupage glue are both suitable for this project and can be used interchangeably.
PVA glue is a much cheaper option that Mod Podge so I recommend it for sticking down the bulk of the paper mache layers. It’s a little bit thicker than Mod Podge so if using it for a final sealing coat add a bit of water to thin it down.
Mod Podge is available in several varieties including gloss, matte and outdoor finishes. I recommend using Mod Podge for the final sealing coat over the paper mache and optionally over the painted finish.
If you are concerned about water getting on your paper mache painted surface, a coat of Mod Podge Outdoor will make the project more water resistant. But keep in mind the Mod Podge Outdoor is not fully weather proof.
Whatever glue you choose to use, this finished planter project is for indoor use only.
How to:

1. Clean out empty protein powder container and remove any labels if possible. Paper mache will cover outside tub surface so if you can’t remove the label don’t worry too much.

2. Measure about 2/3 of the way up the container and mark a cutting line with a marker or wax pencil. Keep in mind that the bottom of the tub will become the plant holder and the top (opening end) of the tub will be the pedestal.
3. Carefully cut around the line. This part can be challenging as the plastic is very thick. I found that using a blade to make a small hole, then cutting with a pair of heavy duty scissors/shears was the easiest way.
Note: If you have access to a power tool that can do this job, I’d recommend it to make this step less difficult.
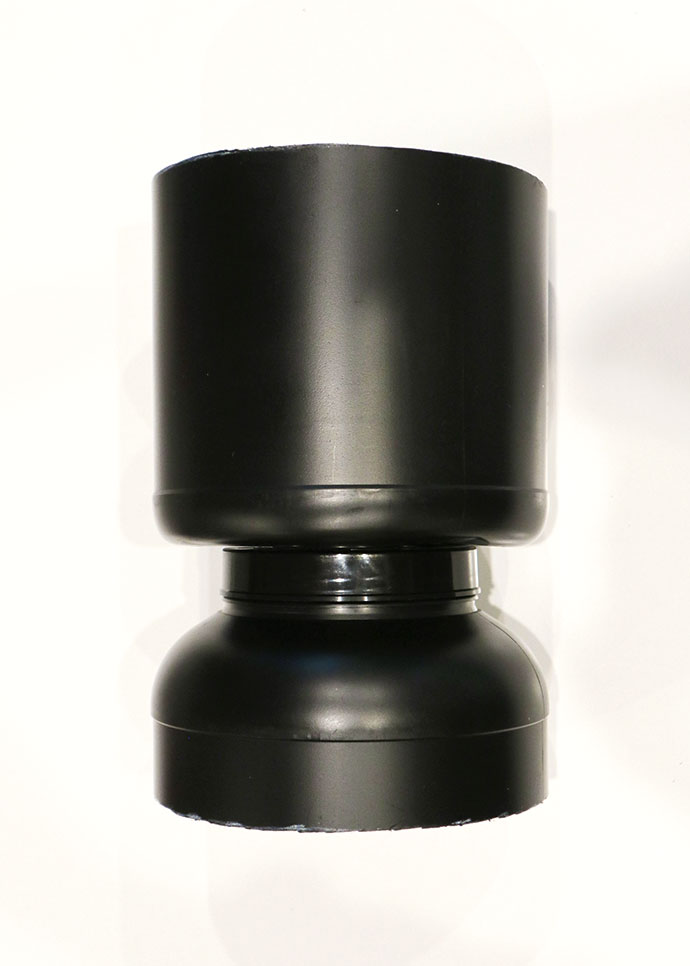
4. Replace the lid on the protein powder tub (if you have it) and then position the top part of the tub on the bottom to create a pedestal. Glue if desired or just secure with a piece of tape to keep it centered.
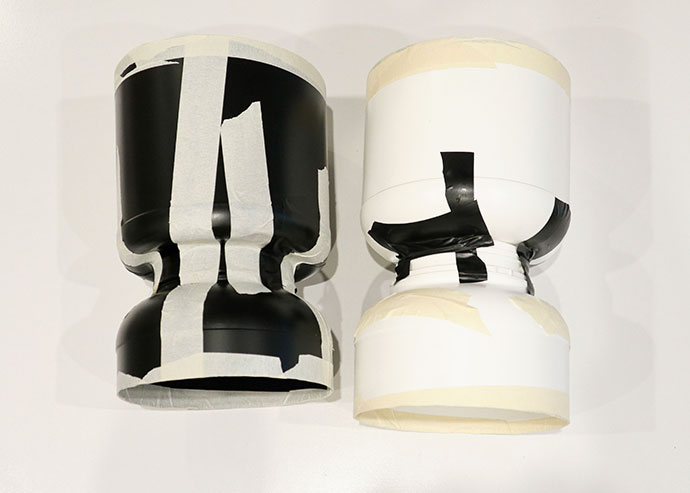
5. Use strong tape to secure the two parts. Tape around cut edges to cover and rough bits of plastic.
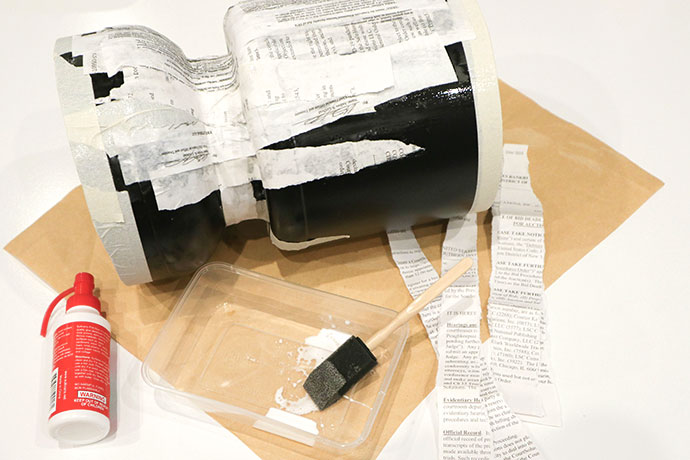
6. Use undiluted PVA glue (or Mod Podge) to glue on strips of paper over the whole planter. Around 3 layers of paper should do the job, allowing glue to dry well between layers. Make sure you lay strips in all directions for added strength. The paper should smooth out any surface bumps (raised branding) on the protein powder tub packaging.

7. When paper mache is thoroughly dry, cover with a coat of Mod Podge or diluted PVA glue to seal.

8. Paint planter as desired. I’ve used 2 coats of Annie Sloan chalk paint and added details with paint pen markers. I drew the designs free hand.
Note: Because I prefer more of a matte finish, I didn’t seal the painted surface. You can add an extra coat of Mod Podge over the painted design if desired for extra durability.

9. To finish off the inside of the planter neatly, I ran a piece of tape around the top to secure the edge of the paper mache and give a clean finish.

10. Sit your indoor plant pots in the planters and enjoy not having having to look at ugly plastic pots ever again. The plants can be easily removed for deep watering or to change up your decor.
All done! What do you think?
The blue planter was made from the white protein powder tub, which was slightly taller (and without a lid). Next time I’d probably cut about 2cm off the base of the pedestal to make the proportions of this taller container more balanced.
The orange floral planter was made from the black container, which was more squat and had slightly less rounded proportions. I like the shape of the orange planter best.

My indoor plants look great in their cheerful new planters. Now I’m just waiting on my friend to finish her next barrel of protein powder so I can make more decorative planters!
LOVE IT? PIN IT!


Your planters look fantastic and I love this idea for reusing containers.
Hey love these! I am definitely going to have a go at this. I am currently making crochetted scrap wool baskets from your pattern for the plants in my classroom. (I just put the pot in a plastic bag before I put it in the basket). These look awesome though. Will have a go. Thanks. Jodie
When we did papier mache as a kid, we used a flour paste. I think it is probably the greener way to go, on a lot of levels. The process takes a bit longer and so does drying, but…
Yes I think trying flour paste would be a great idea although I’d be concerned about dampness and mould if you were using the object as a planter. Sealing the project could avoid this. But would totally work if your container wasn’t to be exposed to moisture.
OMG, I love these and I have a protein powder tub that we just emptied!! Yay!
Tania