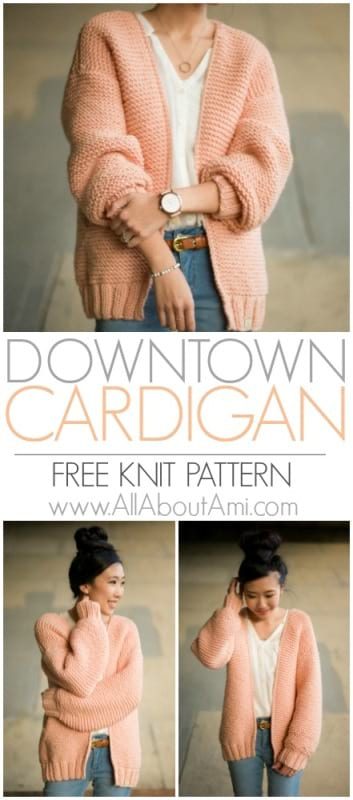
***You can purchase an INEXPENSIVE AD-FREE PDF of this pattern on Etsy HERE and on LoveKnitting HERE! This beautifully formatted PDF includes the step-by-step pictures and pattern and is a total of 6 pages including the cover page! You can also find this pattern in my Easy & Modern Knits Pattern Bundle found HERE (includes over 20 of my knit patterns at a discounted price)! Lion Brand Yarn has made a convenient kit HERE that includes the pattern and all the Color Made Easy yarn needed to make this chunky sweater (5 color options available)!
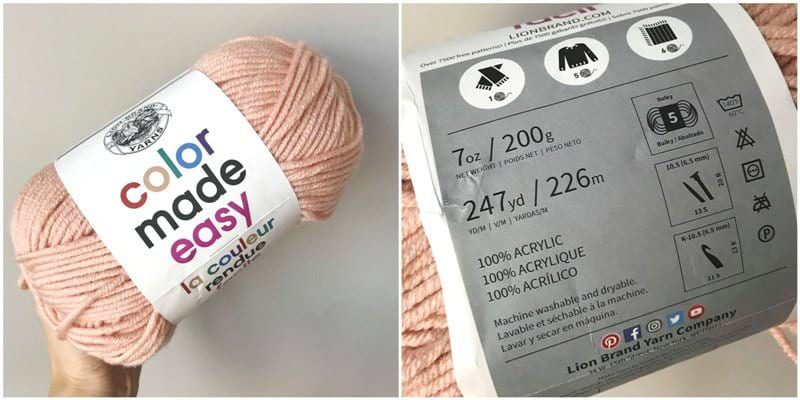
With the popularity of my Midtown Cardigan using lightweight (level 3 yarn), I have always wanted to knit a chunkier version using the same relaxing and beautiful garter stitch. Lion Brand Yarn recently released a stellar new bulky (level 5) yarn called “Color Made Easy” that is available in some gorgeous shades and is a generous size with 200 g/226 m. It is 100% acrylic meaning it is machine washable and dryable and perfect for those of you who have wool allergies. I instantly fell in love with this lovely peachy-pink shade called “Millennial” and knew it was the perfect colour choice for my chunky cardigan! [Note that Color Made Easy has now been discontinued. You can substitute any level 5 bulky yarn such as “Hue & Me” – see other yarn substitution suggestions HERE!]
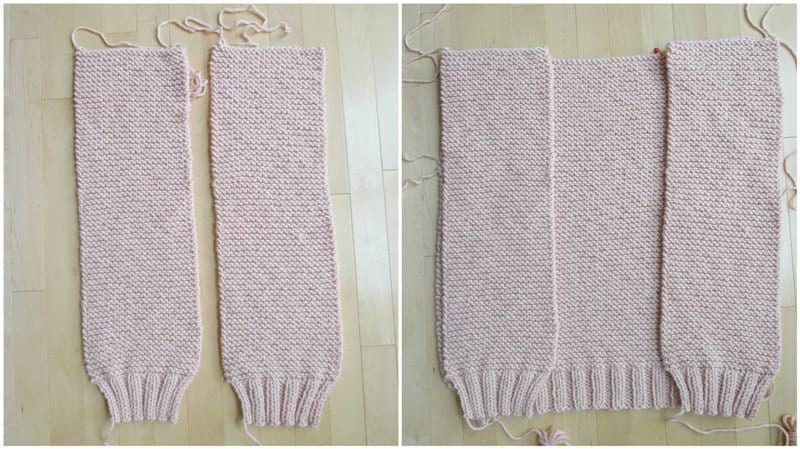
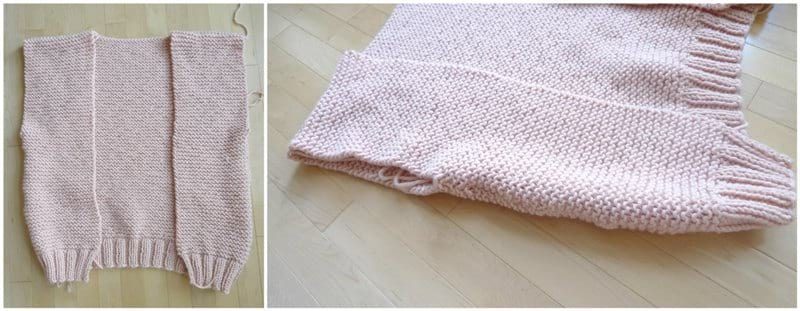
I decided to do a chunkier ribbing by alternating *Purl 2 and Knit 2*. The back panel worked up extremely quickly using 8 mm needles. In fact, I pretty much whipped up the back panel in one evening during one sitting! Knitting with such bulky yarn and large needles is very addictive and fun!

The front panels also worked up very quickly! I love the look of this Color Made Easy Yarn in garter stitch- look at that texture!
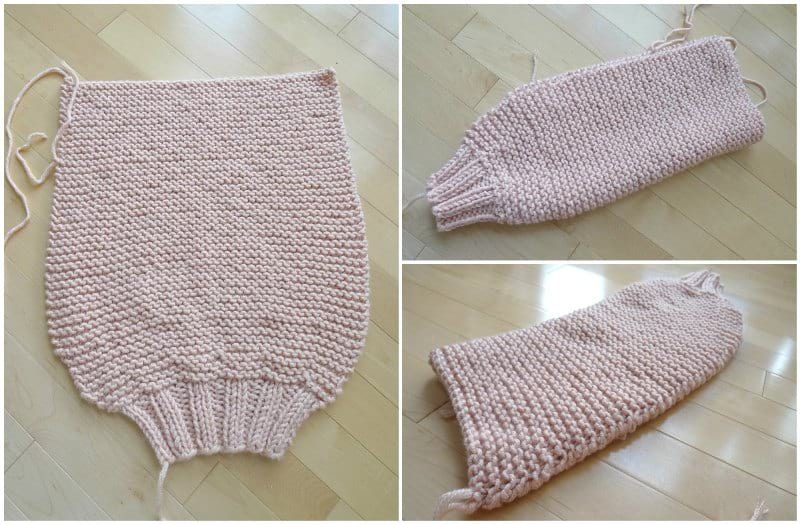
For the sleeves, I decided to make loose, almost balloon-like sleeves with plenty of drape. These oversized sleeves have been very popular lately and look very chic. I adore how the shape of the sleeves turned out! I folded each sleeve in half and whip stitched the edges together.
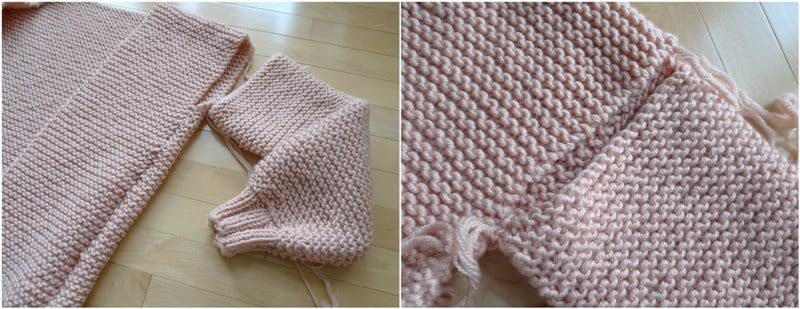
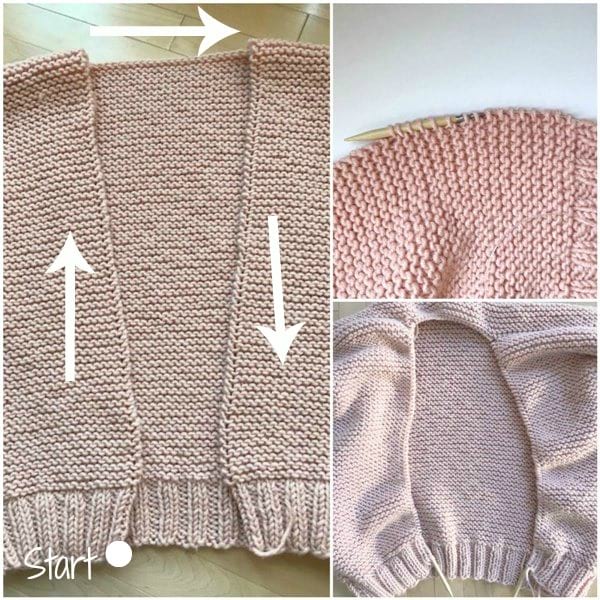
After I was finished knitting all the components, it was time for assembly!
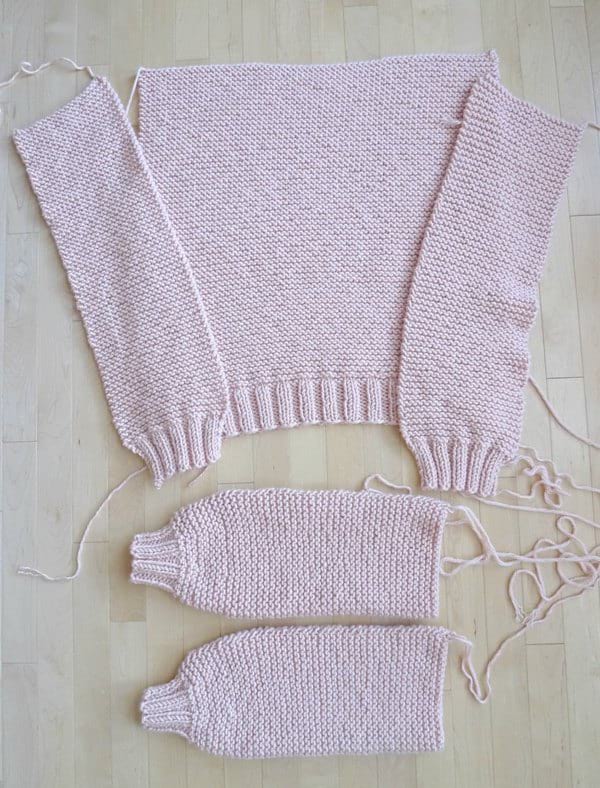
I whip stitched the sides and tops of the front panels to the back panel, leaving an arm opening where I would later attach the sleeve. If you would like a demonstration of how I whip stitched the pieces together, please check out the Midtown Cardigan video HERE as I filmed myself doing the seaming of that particular cardigan!
I then whip stitched the top of the sleeve to the arm opening.
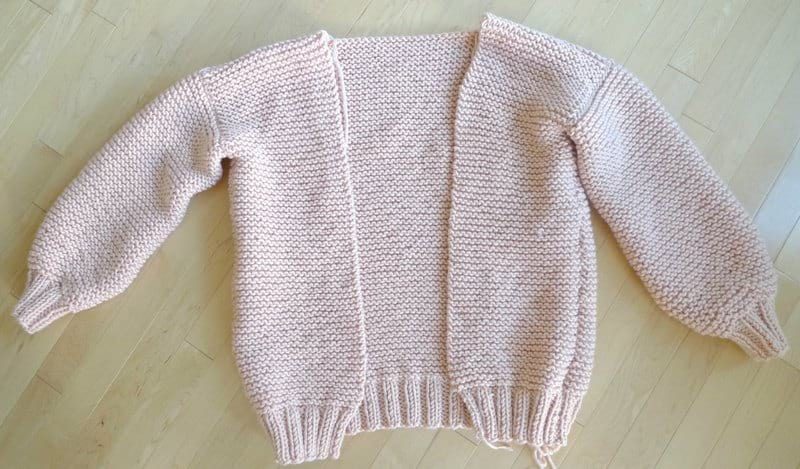
I was so excited at this point as I LOVED how the cardigan was looking! As you can imagine, I immediately tried it on and was thrilled with the fit and drape!
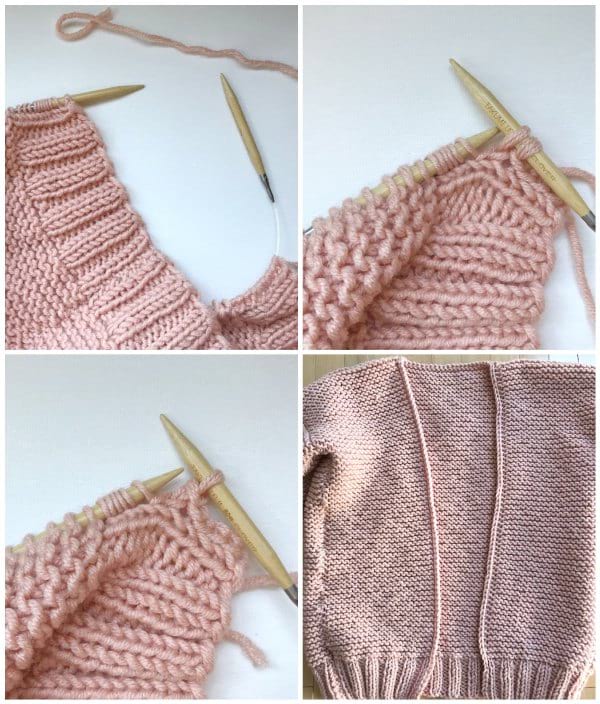
My initial plan was to pick up stitches along the collar and work the same chunky ribbing at the bottom of the front and back panels. However, I found that the ribbing was too bold and took attention away from the garter stitch. If you prefer this ribbing, go ahead and work *Purl 2, Knit 2* across- the amazing part about creating your own clothes is that you can customize it to your liking! After I frogged the chunky ribbing, I tried working stockinette along the collar, and it resulted in this simplistic rolled collar (bottom left). Next, I tried working a daintier ribbing (*Purl 1, Knit 1* across) but then ended up deciding against that too.
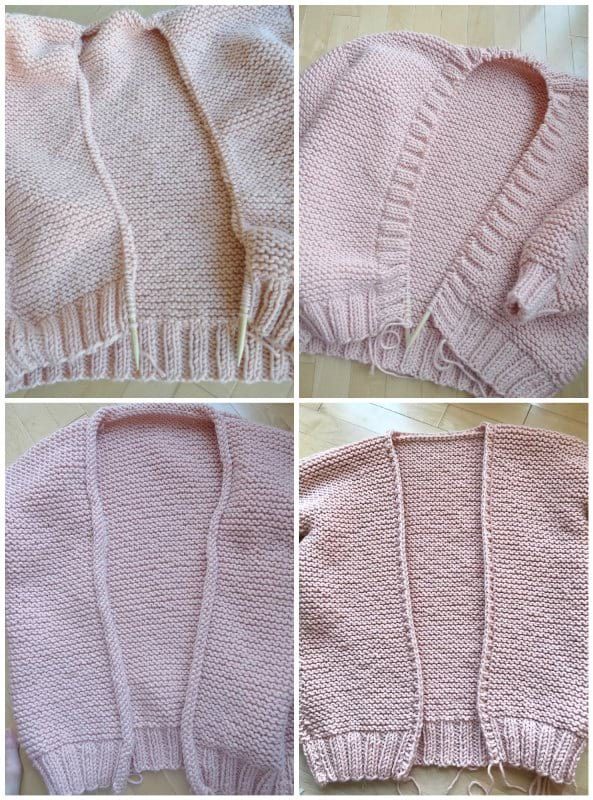
In the end, I decided to place stitches on my needle without adding any working yarn. When you come to the garter section, you can either pick up every stitch between the bumps or pick up one bump for every garter ridge. It is tight when trying to place these stitches on the needle, so you can move down some needle sizes when doing so.
After all the collar stitches were placed on my needle, I then added the working yarn and casted off the stitches. Thus, whenever there were two stitches on my right needle, I casted a stitch off so there was always one stitch left. This resulted in a very clean and simple edge along the collar. If you know how to crochet, I would recommend slip stitching around the collar using an 8 mm crochet hook as this will result in the same look!
******************************
Here is the free pattern for my Downtown Cardigan:
***You can purchase an INEXPENSIVE AD-FREE PDF of this pattern on Etsy HERE and on LoveKnitting HERE! This beautifully formatted PDF includes the step-by-step pictures and is a total of 6 pages including the cover page! You can also purchase a kit HERE on the Lion Brand Yarn website that includes the pattern and all the Color Made Easy yarn needed to make this cardigan!
Knit this gorgeous slouchy cardigan using bulky yarn and the relaxing garter stitch! The Downtown Cardigan is a chunky cardigan that looks so chic with its baggy sleeves, bold ribbing and well-defined stitches. This statement cardigan works up very quickly and is perfect for beginners!
Materials
- Color Made Easy Yarn (bulky level 5) in “Millennial”- see approximate yardage and number of skeins required below; purchase the convenient KIT HERE that contains all the yarn you need! [Note that Color Made Easy has now been discontinued. You can substitute any level 5 bulky yarn such as “Hue & Me” – see other yarn substitution suggestions HERE!]
- Clover Takumi 29″ 8 mm circular needles; 48″ cord for picking up stitches along collar
- Yarn needle
- Lock ring stitch markers
Gauge: 11 stitches and 20.5 rows = 4 inches in garter stitch
Final Measurements:
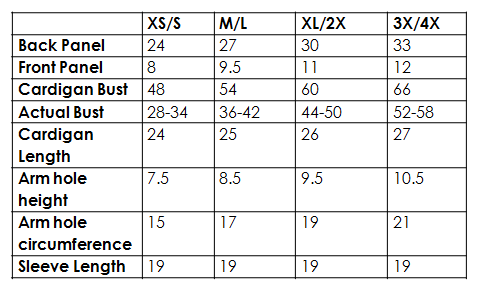
- Width across back: 24″/61 cm (XS/S), 27″/69 cm (M/L), 30″/76 cm (XL/2X), 33″/84 cm (3X/4X)
- Length: 24″/61 cm (XS/S), 25″/63.5 cm (M/L), 26″/66 cm (XL/2X), 27″/69 cm (3X/4X)
- Sleeves: 19″/48 cm (stays the same as panels bend down to become part of sleeve)
Here is a size chart for reference (in inches):
Approximate Yardage/Number of Skeins Required:
Extra Small/Small: 4 skeins, ~ 780 g/965 yds
Medium/Large: 5 skeins, ~ 905 g/1120 yds
Extra Large/2X: 6 skeins, ~ 1050 g/1300 yds
3X/4X: 6 skeins, ~ 1200 g/1480 yds
Notes:
- KFB = Knit Front and Back Increase: Step 1: Knit the first stitch on your main needle. Step 2: Before taking the stitch off the main needle, insert the tip of your working needle into the backside of the loop and knit it through the back loop. Then pull the stitch off the needle. See tutorial and video on how to do KFB HERE on New Stitch A Day.
- One back panel and two fronts panels are knitted in garter stitch and seamed together at the top and sides, leaving space for the arm holes. These panels are worked from the bottom up starting with the ribbing.
- The sleeves are worked from the bottom up (starting from the ribbing as well), whip stitched along the edge, and then attached to the arm holes.
- Stitches are picked up along the collar and casted off for a simple and clean edging (collar variations are offered).
- To learn or refresh yourself on how to knit the garter stitch, please reference my step-by-step tutorial and video HERE!
Sizing Notes:
- This drop sleeve cardigan is oversized, relaxed, loose, and slouchy (14-20” of positive ease built into the design). For example, if my actual bust is 32”, the bust of the cardigan is 48” (48” – 32” = 16”). The cardigan is 16” wider than my actual bust. The sleeves are designed to be long and baggy with plenty of drape.
- Part of the front and back panels become part of the sleeve as they bend past the shoulders. The sleeve length remains the same for all sizes, but the increased width in the front and back panels help lengthen the sleeves of the larger sizes. The width of the sleeve varies by size.
- If you would like the cardigan to be wider, increase the number of stitches you cast on for the front and back panels.
- If you would like the cardigan to be narrower, decrease the number of stitches you cast on for the front and back panels.
- If you would like the cardigan to be longer, increase the number of rows for the back and front panels. If you would like the cardigan to be shorter, decrease the number of rows for the back and front panels.
- There are three increase rows for the sleeves (Sleeve row numbers 12, 16 and 26). If you do not want the sleeves to be as baggy and voluminous, you can do fewer increase rows (for example, omit the last increase row and continue with the same stitch count). You can also try knitting a smaller size sleeve if you do not want the sleeve to be as baggy (e.g. follow the XS/S sleeve size for the M/L cardigan).
- Be sure to follow the sleeve pattern for your specific size as the Increase rounds vary for Rows 12, 16 and 26 for each size.
- If you do not want your cardigan to be as oversized, go down a size (e.g. if you normally wear a Medium, you can knit the XS/S size).
- I am wearing a size Extra Small/Small. I am 5’6 for height reference.
PATTERN
Back panel
We will begin with the ribbing.
Cast on 66 (74, 82, 90) stitches using long tail cast-on.
Row 1: *Purl 2, Knit 2* across and Purl the last two stitches. (66, 74, 82, 90)
Row 2: *K2, P2* across and Knit the last two stitches. (66, 74, 82, 90)
Row 3-11: Repeat Rows 1 and 2.
Ribbing is now complete! We will now move into the garter section.
Row 12-123: Knit all stitches. (66, 74, 82, 90)
Cast off all stitches for Size XS/S.
Row 124 – 128: Knit all stitches.
Cast off all stitches for Size Medium/Large.
Row 129 – 133: Knit all stitches.
Cast off all stitches for Size Extra Large/2X.
Row 134– 138: Knit all stitches.
Cast off all stitches for Size 3X/4X.
- Front panels (make 2)
We will begin with the ribbing.
Cast on 22 (26, 30, 34) stitches using long tail cast-on.
Row 1: *Purl 2, Knit 2* across and Purl the last two stitches. (22, 26, 30, 34)
Row 2: *K2, P2* across and Knit the last two stitches. (22, 26, 30, 34)
Row 3-11: Repeat Rows 1 and 2.
Ribbing is now complete! We will now move into the garter section.
Row 12-123: Knit all stitches. (22, 26, 30, 34)
Cast off all stitches for Size Extra Small/Small.
Row 124 – 128: Knit all stitches.
Cast off all stitches for Size Medium/Large.
Row 129 – 133: Knit all stitches.
Cast off stitches for Size Extra Large/2X.
Row 134 – 138: Knit all stitches.
Cast off stitches for Size 3X/4X.
- Sleeves (make 2)
We will begin with the ribbing.
Cast on 24 (28, 32, 36) stitches using long tail cast-on.
Row 1: *Purl 2, Knit 2* across. (24, 28, 32, 36)
Row 2-11: Repeat Row 1.
Ribbing is now complete! We will now move into the garter section.
Row 12 (Increase row #1):
Size XS/S: *Knit 3, KFB*, rep 6 times. (30)
Size M/L: Knit 2. *Knit 3, KFB*, rep 6 times. Knit 2. (34)
Size XL/2X: *Knit 3, KFB*, rep 8 times. (40)
Size 3X/4X: K3. *Knit 2, KFB*, rep 10 times. K3. (46)
R13-15: Knit all stitches. (30, 34, 40, 46)
R16 (Increase row #2):
Size XS/S: *Knit 4, KFB*, rep 6 times. (36)
Size M/L: K2. *Knit 4, KFB*, rep 6 times. K2. (40)
Size XL/2X: K2. *Knit 5, KFB*, rep 6 times. K2. (46)
Size 3X/4X: K2. *K6, KFB*, rep 6 times. K2. (52)
R17-25: Knit all stitches. (36, 40, 46, 52)
R26 (Increase row #3):
Size XS/S: *Knit 5, KFB*, rep 6 times. (42)
Size M/L: K2. *Knit 5, KFB*, rep 6 times. K2. (46)
Size XL/2X: K2. *Knit 6, KFB*, rep 6 times. K2. (52)
Size 3X/4X: K2. *Knit 7, KFB*, rep 6 times. K2. (58)
R27-97: Knit all stitches. (42, 46, 52, 58)
Cast off all stitches.
Assembly:
- When seaming pieces together, always join wrong sides together to make the seams less visible, then flip inside out at the end.
- Fold each sleeve in half lengthwise and whip stitch sides together.
- Whip stitch tops of front panels to back panel. Whip stitch sides of front panels to back panel, making sure to leave an arm hole. Place sleeve towards top of panels and see how much space is needed for arm holes.
- Whip stitch top of sleeve to arm hole.
- For a video demonstration of the seaming, please check out the Midtown Cardigan video HERE as I filmed myself whip stitching the components of that particular cardigan together!
Collar:
Using 8 mm needles (or smaller to make it easier),
Starting from bottom left corner, pick up stitches by placing them on needle without using working yarn. Pick up stitches along front panel, across the back panel, and down the front panel. When picking up stitches along vertical edge of garter stitch, pick up one stitch between each ridge OR pick up one bump for every garter ridge. Once all stitches have been picked up around the collar, we will begin working from the bottom left corner by adding the working yarn. Use working yarn to begin casting off stitches for a simple clean edge.
Collar Alternatives:
- Using 8 mm crochet hook, slip stitch around collar to work a similar edging as described above.
- Pick up stitches around collar with working yarn and work *P2, K2* around (same ribbing as panels). Knit desired number of rows for wider and bolder collar. Note that more yarn may be required depending on number of rows added.
- Pick up stitches around collar with working yarn and work *P1, K1* around for a more delicate collar. Note that more yarn may be required depending on number of rows added.
- Pick up stitches around collar with working yarn and alternate rows of knit stitches and purl stitches for a rolled stockinette collar.
To pick up stitches using working yarn, insert your needle into the first stitch along the edge. Yarn over, then pull up a loop. You keep inserting your needle into the next stitch, yarning over, and pulling up a loop- see this post HERE for photo and video tutorial.
Please see my Downtown Cardigan video below to see the basic techniques used to knit this design (I demonstrate how to cast on stitches, do the ribbing, work the garter stitch, cast off stitches, and pick up stitches for the collar)!
**************************
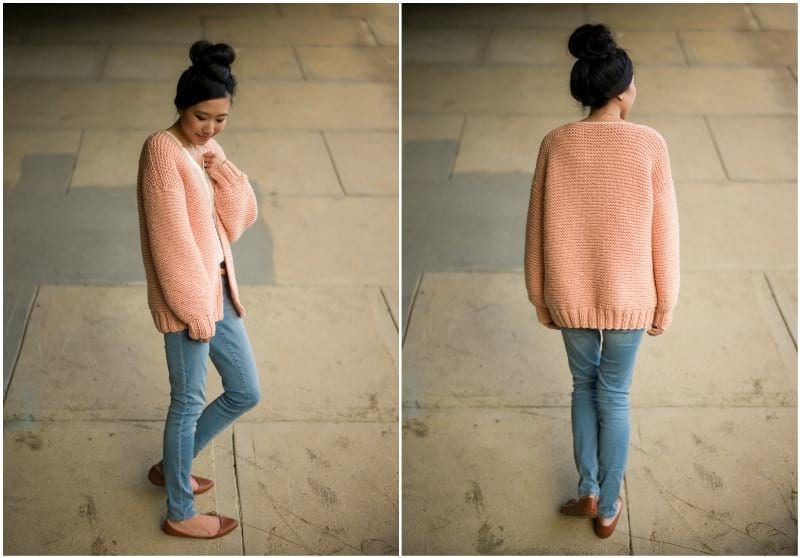
I am absolutely in love with this new pink cardigan, and it is one of my favourite designs to date! It has such an effortlessly chic look with its chunky style and baggy sleeves. Doesn’t the Downtown Cardigan look so stylish with the sleeves scrunched up?
![]()
I knew I wanted to name this beautiful cardigan the “Downtown Cardigan” since it is the sister cardigan to the Midtown Cardigan. The extra long sleeves provide such a cozy feel! I love being able to hide my entire hands in the warmth of this cardigan on chilly days.
![]()
If you are a crocheter who has been interested in learning how to knit, I highly recommend you give this design a try! The bulky yarn and large needles give you immediate gratification as this project will fly off your needles as you practice the simple garter stitch. You can see my “How to Knit the Garter Stitch” tutorial HERE as it contains detailed step-by-step photos and a video tutorial as well!
![]()
Here is what the back of the Downtown Cardigan looks like! It is the perfect length as it covers the bum and provides great coverage. I cannot wait to wear this beloved Downtown Cardigan more and style it with different outfits! Chunky cardigans never go out of style, and it is amazing how we can knit our own in whatever colour we want!
I hope you enjoyed reading about this beautiful Downtown Cardigan and are inspired to give this quick and stylish project a try! The drape, the color, the crisp stitches…it all works so well together!
****If you are interested in knitting this cardigan together, I will be hosting a very casual KNITALONG so we can encourage one another as I provide a general guideline of what section to tackle week by week. Join the Downtown Cardigan Knitalong Facebook group HERE as we can show each other our progress and finished cardigans! You can also use the hashtags #downtowncardigan and #downtowncardigankal so we can all see your work on social media! You can also subscribe to my e-mail newsletter HERE to get all my updates! Purchase the Downtown Cardigan kit HERE in your choice of colour and let the knitting fun begin! I can’t wait to see everyone’s gorgeous chunky Downtown Cardigans! Happy knitting, everyone!
This pattern is an original pattern by Stephanie Lau of All About Ami. Please do not claim this pattern as your own. If you wish to share this pattern, you may link to this pattern but please do not reprint it on your site. You may keep a copy for your own personal use but please DO NOT sell the pattern or distribute it.
You may sell products made from this pattern but please clearly credit the design to me, Stephanie Lau of All About Ami, and provide a link to my blog www.AllAboutAmi.com. Permission is NOT granted for mass production or factory manufacturing of any kind. Thank you for being respectful and for your understanding!