
How To Make a Beautiful Pendant Lampshade Out of Wrapping Paper
We independently select these products—if you buy from one of our links, we may earn a commission. All prices were accurate at the time of publishing.

(Image credit: Charlotte Tolhurst and Lana Louw)
I have always loved the look of an origami lampshade — the simplicity and graphic nature makes it a statement piece in any home. When my friend Erin showed me her new book Paper Parties, I couldn’t believe how easy it was to replicate one of these at home, for a fraction of the price you will pay in the shop, and you get to choose any pattern you would like! Today we’re lucky to have Erin here giving us step-by-step instructions on how to create one of these gorgeous lampshades yourself.

(Image credit: Charlotte Tolhurst and Lana Louw)
What You Need
Materials
- Wrapping paper
(3 sheets, A1 size) - Black/white baker’s twine
Tools
- Scorer or scalpel
- Ruler
- Sticky tape
- Hole punch
- Scissors
- Double-sided tape
Instructions
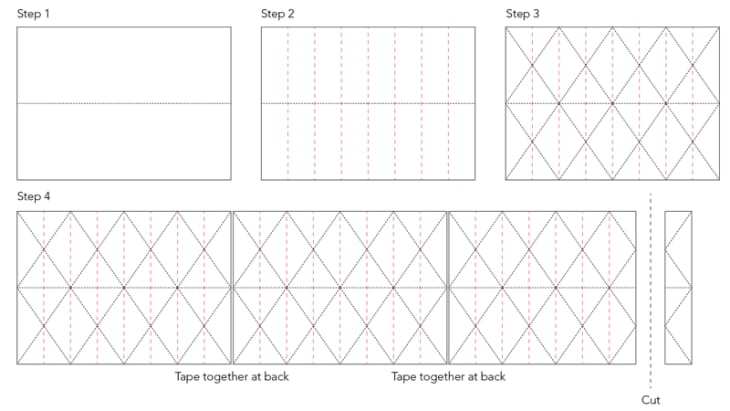
(Image credit: Erin Hung)
- Place the first sheet of paper in front of you with the long edges horizontal. If the paper is single-sided, the front (patterned) side should be facing up. Following the folding guide, fold the sheet in half to make a horizontal mountain fold (a fold that points upwards).
- Make seven equally spaced vertical valley folds (folds that point downwards), dividing the sheet into eight equal columns.
- Use a scorer or scalpel and a ruler to score diagonal lines as shown on the diagram, using the previous fold lines as guides. Crease these scored lines into mountain folds.
- Repeat with the remaining two sheets of paper to make three identical pieces.
- Use sticky tape to join the three sheets together on the back to make one long sheet. Cut off the end column of the strip along the fold as indicated on the diagram.
- You should now be able to fold the paper inwards (horizontally) from the sides, naturally following the direction of the folds to collapse it into a flat folded piece.
- Use a hole punch to cut two holes through each layer
of the flattened piece. Position the holes as shown in the photograph. You will probably need to do this a few layers at a time, depending on your hole punch. - Cut two 50cm (20-inch) lengths of twine and thread one through each stack of punched holes, then allow the folded paper to open into a round lantern shape. Tie each string securely into a double knot and trim the loose ends.
- Tuck one end of the lantern under the folds of the other end to complete the spherical shape and secure in place with double-sided tape.
Thank you for sharing your tips, Erin!
Excerpt from Paper Parties by Erin Hung, Published by Pavilion. Photographs by Charlotte Tolhurst and Lana Louw.