

If it’s not obvious already, my mantra has always been to try DIY instead of buying. Last year, I swiped a honeycomb lantern from a party. Craft geek that I am, I deconstructed it. Who would’ve thunk that it was such a simple thing to craft up? Here’s the tutorial for making DIY honeycomb lanterns.
You’ll need sheets of lightweight paper. For this tutorial I used newsprint that was about 30lb or 50gsm. It was the perfect weight!

I didn’t want to waste any paper, so I cut the sheets in half. Just the right size for 6″ circles.
I used the Martha Stewart Circle Cutter to cut several sheets of the newsprint. I also cut one circle using a heavy cardstock.

Fold all the circles in half.

Then, cut.

I grabbed a scrap sheet of cardstock to use as my guide. Make sure the sheet is bigger than the size of your circles. With a pencil, I marked the guide at 1-inch increments.

To make things easier, grab two different colored Sharpies and write over the lines. Make sure to alternate between the two colors.
Start off with half of the cardstock circle. It will serve as your base.

Using a glue pen, draw straight lines, using the colors as your guide. Here, I started with the blue lines.

Then, stick on the lightweight paper.

Continue, but use the green lines as your guide for the next layer. Keep alternating guide colors with each layer.

When you get to a good stack, finish off with the other cardstock circle half.

With clear tape, tightly secure the edge of the stack. This is just to keep everything aligned and in place.

You’re bound to end up with a perfectionist’s nightmare once you’re done. Don’t worry, you can still trim the edges.

Let the glue dry a bit before opening and testing out the accordion of the honeycomb lantern.
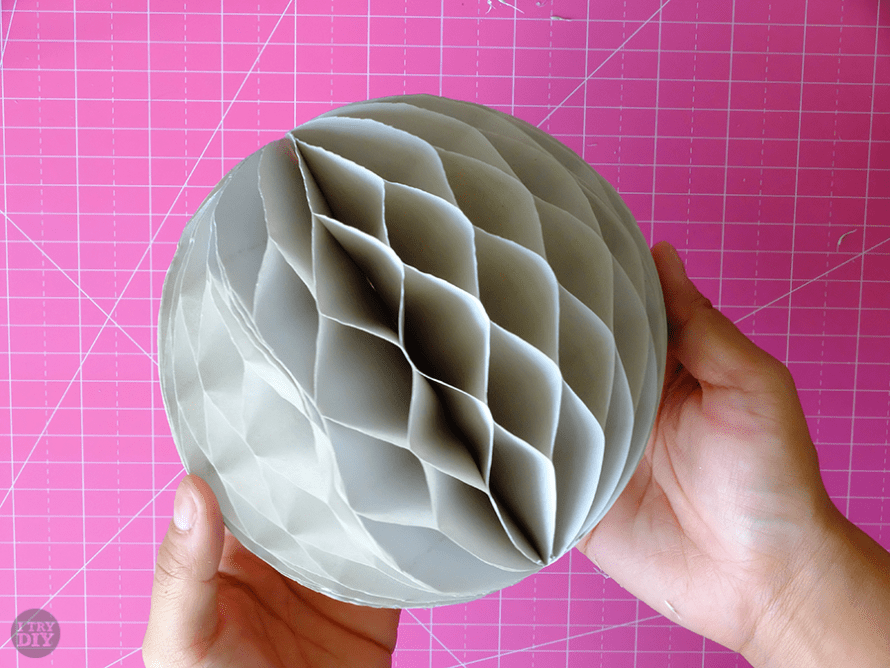
All done!

Such a great way to pretty up a party. It would make a great backdrop for a photo booth, too, don’t you think?
Tag @mikkomix or @itrydiy when you post your final projects on instagram. I’d love to see your work! Happy crafting!


Caroline Driver
1960’s Christmas decorations were like this, in tissue paper
Ana
This is fantastik ❤️l love this job !
Deb
Wow, what a great idea – am looking forward to trying this. Thanks!!