
Clay Arrow Paper Clip
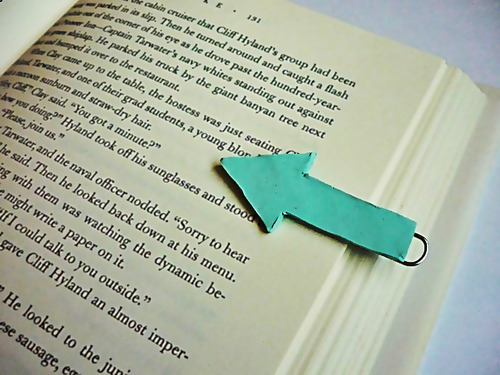
I saw this really neat finger shaped bookmark the other day and then promptly lost the link for it. Of course. So with that in mind, I made this arrow shaped paper clip. It looks nothing like the original I saw, but it was done in a matter of hours. Yay for instant gratification!

1. Supplies:
- polymer clay
- paper clip
- permanent glue
- pen and paper
- scissors
- x-acto knife (or any knife would work)
2. Draw an arrow on some paper and cut it out. Or if you’re super artistic, draw a finger. I was worried about being able to carve it out of the clay but I’m sure it can be done.
3. Press your clay out to be about ¼ of an inch thick. Place the paper arrow onto the clay and carefully knife around it. Once you’ve gone all the way around, pull the excess clay away from the arrow. (You can always make some of these pretty little roses with the scrap clay!) Place the arrow in a glass baking dish and put it in the oven according to the instructions on your clay. Sculpey instructions are: Bake at 275 °F (130 °C) for 15 minutes per ¼ in (6 mm) thickness.
4. After it’s baked and cooled, glue it to the paper clip, BUT only to one side. You still want it to function as a paper clip. I put very little glue along the longest bend in the clip and it seems to be plenty sturdy. The trick is to use very strong glue.
My arrow ended up being a little too thick for a bookmark, but it’s still fun to use while reading, and definitely adds a little more character to otherwise boring stacks of paper.
30 notes
 crazyf0xes liked this
 nobody-40 liked this
paolamoro reblogged this from makinglovely
habitualsanity liked this
fromvoidtovoid liked this
josiemakes liked this
itsasta reblogged this from makinglovely
risibleescapade-blog liked this
diypicture reblogged this from makinglovely
 aibufer liked this
  vanettapie613-blog liked this
 hhhhopes liked this
creativeinspirati0n reblogged this from makinglovely
tricksterlings liked this
floppyfrenchfries-blog reblogged this from makinglovely
ivybrooke21 liked this
opples-and-bononos liked this
gulliblejoker liked this
italiancreamsoda liked this
scribblingthis reblogged this from makinglovely
alycreates liked this
makinglovely posted this